10 Bow Nails 2026: Cute Coquette Designs
Bow nails have quietly become one of the sweetest manicure trends of 2026, and honestly, we are not surprised. There is something about a tiny painted ribbon or a delicate 3D bow charm that turns an ordinary manicure into a romantic little statement. Whether you love classic coquette nails or just want a feminine touch on a classic French tip, bow nails give you endless room to play with colour, shape and detail.
In this list, we are sharing ten cute bow nail designs that work across every shape and length. You will find everything from classic red bows with a vintage feel to soft blush pink bow nails, minimal white bows on nude bases, and glam gold versions made for evenings out. Each design includes easy styling tips so you can recreate the look at home or show your nail tech exactly what you want, whichever route you prefer.
From tiny accent bows to bold statement charms, this collection covers the prettiest ways to wear bow nails this year. Pin your favourites for your next salon visit. These coquette nail ideas prove that sometimes the smallest detail makes the biggest difference.
Classic Red Bow Nails
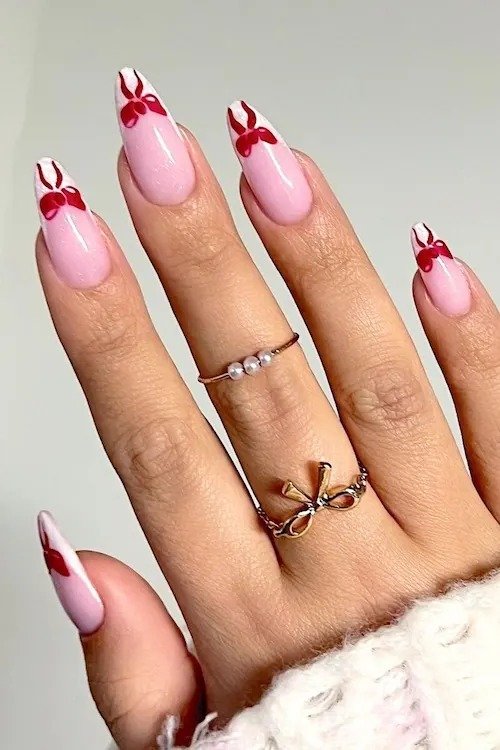
There is a reason classic red bow nails never really leave the spotlight. Painted red bows on a soft pink base with crisp white French tips give the design a vintage, almost Hollywood feel, while keeping it playful rather than severe. Place a dainty red bow on every nail for a full ribbon effect, or keep the bows to your ring fingers as accents. The contrast between the bold red bows and the pale pink and white base is what makes this look so striking, and it photographs beautifully for Pinterest. This is one of those bow nails designs that suits almost every skin tone, especially on almond or oval shapes. For a festive twist, this pairing also works beautifully through the holiday season, when red manicures feel especially right, which is why these bow nails never date.
To get this look at home, start with a soft pink base and crisp white French tips, letting each layer dry fully. Use a fine striping brush and red nail art polish to draw each bow on the tips: two triangles for the loops, two short tails, and a dot in the centre. Keep the bows neat, because oversized loops can look cartoonish against the delicate base. A generous layer of glossy top coat seals everything and gives the manicure that expensive salon shine. For extra longevity, cap the free edge of each nail. This design lasts beautifully for up to two weeks with gel polish. If you are new to nail art, practise the bow shape on paper first until the loops look even. A dotting tool helps place the centre dot precisely, and cleaning up edges with a small brush dipped in acetone keeps everything crisp.
Blush Pink Painted Bows
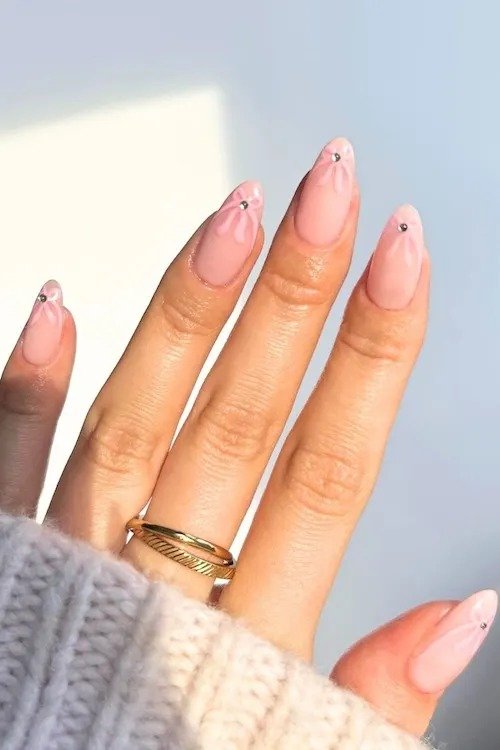
Blush pink bow nails are the softest entry point into the coquette nails trend, and they flatter just about everyone. Start with a milky pink or sheer nude base, then add hand-painted bows in a slightly deeper rose or dusty pink shade. The tone-on-tone effect feels delicate and grown-up, like the nail equivalent of silk ribbon. Because the palette stays within one colour family, this design works beautifully on short natural nails as well as longer almond shapes. It is also one of the most office-friendly ways to wear the bow trend, since the bows read as a subtle detail rather than a loud statement. If you prefer your manicures sweet but understated, blush pink is your shade. This gentle palette also makes regrowth less noticeable, so your manicure looks fresher for longer between appointments.
The trick to nailing this look is keeping the base sheer and the bows defined. Apply one or two thin coats of a milky pink polish so the natural nail shows through slightly, which keeps the finish fresh and modern. Then paint each bow with a deeper pink using a detail brush, adding a tiny rhinestone at the centre of each bow for dimension. Place a single bow on each nail for a uniform look, or keep most nails plain with bows on just the accent fingers. Finish with a glossy top coat, and you have a dreamy coquette manicure in under an hour. For an even softer finish, try a matte top coat instead of glossy; it gives the bows a velvety, ribbon-like texture. Just remember that matte finishes show chips more easily, so keep a bottle of top coat handy for touch-ups through the week.
Black Bow French Tips
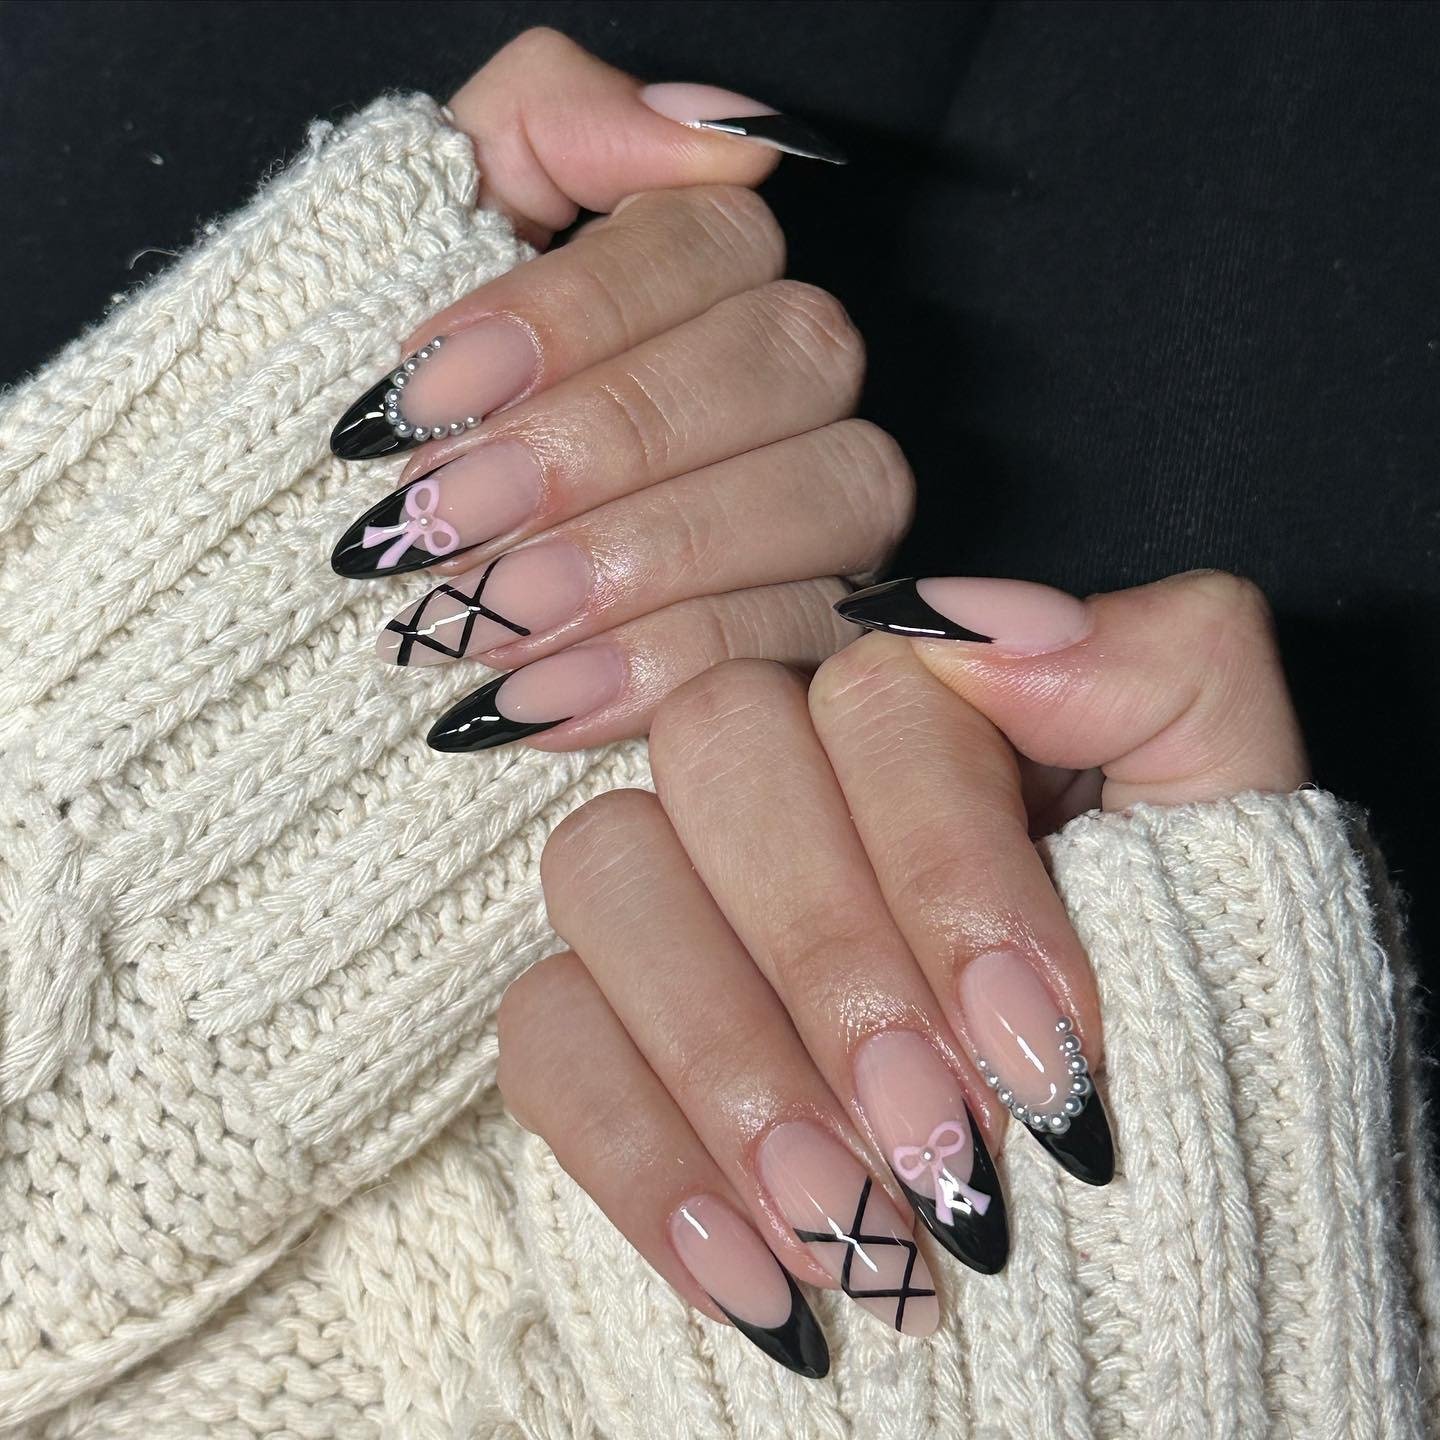
Black bow French tips take the classic French manicure and give it a moody, modern edge. Instead of the traditional white tip, you paint slim black tips on a nude or milky base, then add a tiny bow in pink, black or white just below the tip on one or two nails. The result is chic and slightly rebellious, perfect for anyone who loves the coquette aesthetic but wants something with a little attitude. This design looks especially striking on almond or coffin shapes, where the elongated tip gives the bow room to shine. It is also a brilliant option for autumn and winter, when darker manicures feel right. The monochrome palette also pairs beautifully with silver jewellery and dark clothing, making it a natural fit for evening wardrobes. Despite the dark tips, the nude base keeps the overall effect light enough for everyday wear.
Precision matters most with this design, so take your time on the tips. Use French tip guides or a steady hand with a striping brush to create clean, even black lines. Once the tips are dry, add the bow with a detail brush, keeping it petite so it does not overwhelm the tip. A white bow on black tips creates a lovely contrast, while an all-black bow keeps things sleek and monochrome. Seal with a high-shine top coat for a glass-like finish. This is one of those bow nails ideas that gets compliments everywhere, from the office to a night out. If freehand tips feel intimidating, press-on French tip guides from any beauty shop make the process foolproof. Take a photo in natural light when you are done; crisp black tips photograph strikingly and are made for sharing.
3D Pearl Bow Charms
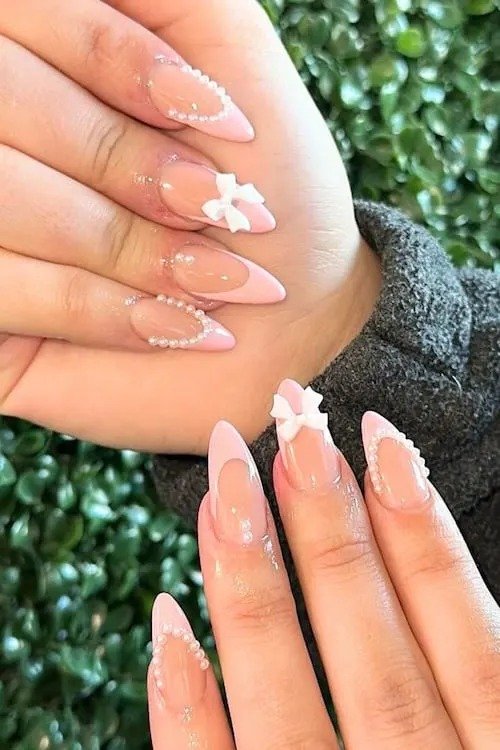
When you want your bow nails to make a real statement, 3D pearl bow charms are the way to go. These tiny sculpted bows, often finished in pearlescent white or iridescent pink, sit on top of the nail like miniature jewellery. They catch the light beautifully and give even the simplest base colour a luxurious feel. Pair them with a milky white or soft pink base for a bridal-ready look, or with a deep burgundy base for something more dramatic. Because the charms add real dimension, this design is best on medium to long nails that can carry the extra detail. It is pure coquette glamour. Many charms come in sets with matching pearls and tiny crystals, so you can mix and match across nails. The three-dimensional detail catches candlelight and camera flashes alike, which makes this design a favourite for special occasions and photoshoots.
You can buy 3D bow charms easily from nail supply shops, and applying them is simpler than it looks. Do your base manicure first, then use a small dot of nail glue or builder gel to attach one charm per accent nail, usually the ring finger. Press gently and hold for a few seconds, then cure under a lamp if you used gel. Finish by floating top coat around, not over, the charm to keep its shine. These charms are surprisingly durable and can last the full life of a gel manicure. Just be a little gentle with your hands, and they will stay put. Store leftover charms in a small bead organiser so they stay sorted by size and colour. With gentle wear, a single pack will last through many manicures, making this one of the most cost-effective ways to get a luxury look.
Tiny Bow Accent Nails
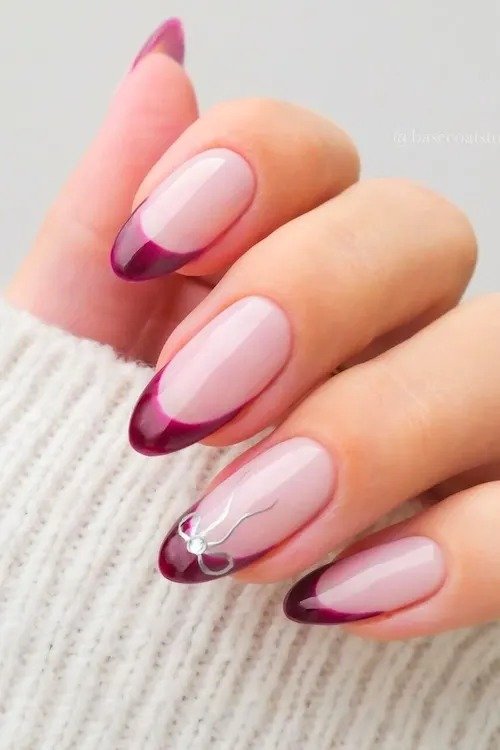
Tiny bow accent nails are proof that you do not need much to make a big impression. This design keeps most nails simple, think a sheer pink base with deep plum French tips, with one miniature silver bow painted on a single accent nail per hand. The effect is delicate and dainty, like a whisper of the coquette trend rather than a shout. Because the bow is so small, this look works beautifully on almond or oval shapes, where the single accent gets room to shine. If you keep your nails short, you will also love our short nail ideas roundup for more petite-friendly inspiration. The single-accent approach means quick application and easy repairs. It is an ideal first attempt at nail art, since any small wobble in the bow is barely noticeable at this tiny scale, which makes these bow nails perfect for beginners.
The key here is restraint and neatness. Choose a base colour that is close to your natural nail, such as a sheer nude or milky pink, and apply it evenly. Then, using the very tip of a detail brush, paint a single tiny bow on the accent nail, no bigger than a few millimetres across. A silver or white bow looks especially chic against the pink and plum palette. Because the design is so simple, flawless cuticle work and a glossy top coat matter more than ever. This minimal approach to bow nails is effortlessly elegant and suits every occasion. Because the base is so neutral, this manicure grows out gracefully and pairs with literally everything in your wardrobe. It is the definition of quiet luxury with a playful twist.
White Minimal Bow Nails
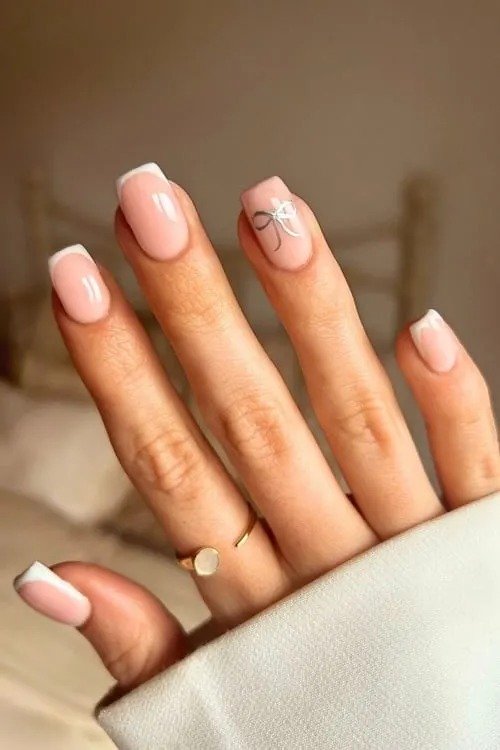
White minimal bow nails are the clean-girl answer to the coquette trend. A soft nude or barely-there beige base keeps the manicure fresh and natural, while crisp white or delicate silver bows add just enough detail to feel intentional. This is one of the most versatile bow nails designs you can wear: it suits every season, every outfit and every occasion, from weddings to work meetings. The monochrome palette also makes it incredibly easy to match with jewellery and accessories. If you love the idea of bows but want something timeless rather than trendy, this is the design to bookmark. White on nude also has a bridal feel without being as traditional as a full French manicure, so it is popular with bridesmaids too. The look stays fresh for weeks, since pale colours hide tip wear better than dark shades.
For the prettiest result, keep your base sheer rather than opaque. Two thin coats of a nude polish that matches your skin tone will create a your-nails-but-better effect, which you can explore further in our nude nails collection. Paint the bows in a bright, clean white or soft silver using a fine brush, placing one bow near the cuticle or centred on each nail. Small, symmetrical bows look best here, so take your time and wipe the brush between strokes. A glossy top coat ties it all together. Simple, polished and endlessly wearable. If your white polish tends to go on streaky, apply it in very thin layers and let each one dry fully before adding the next. Two whisper-thin coats always look smoother than one thick one, especially with bright white shades.
Golden Bow Glam Accents
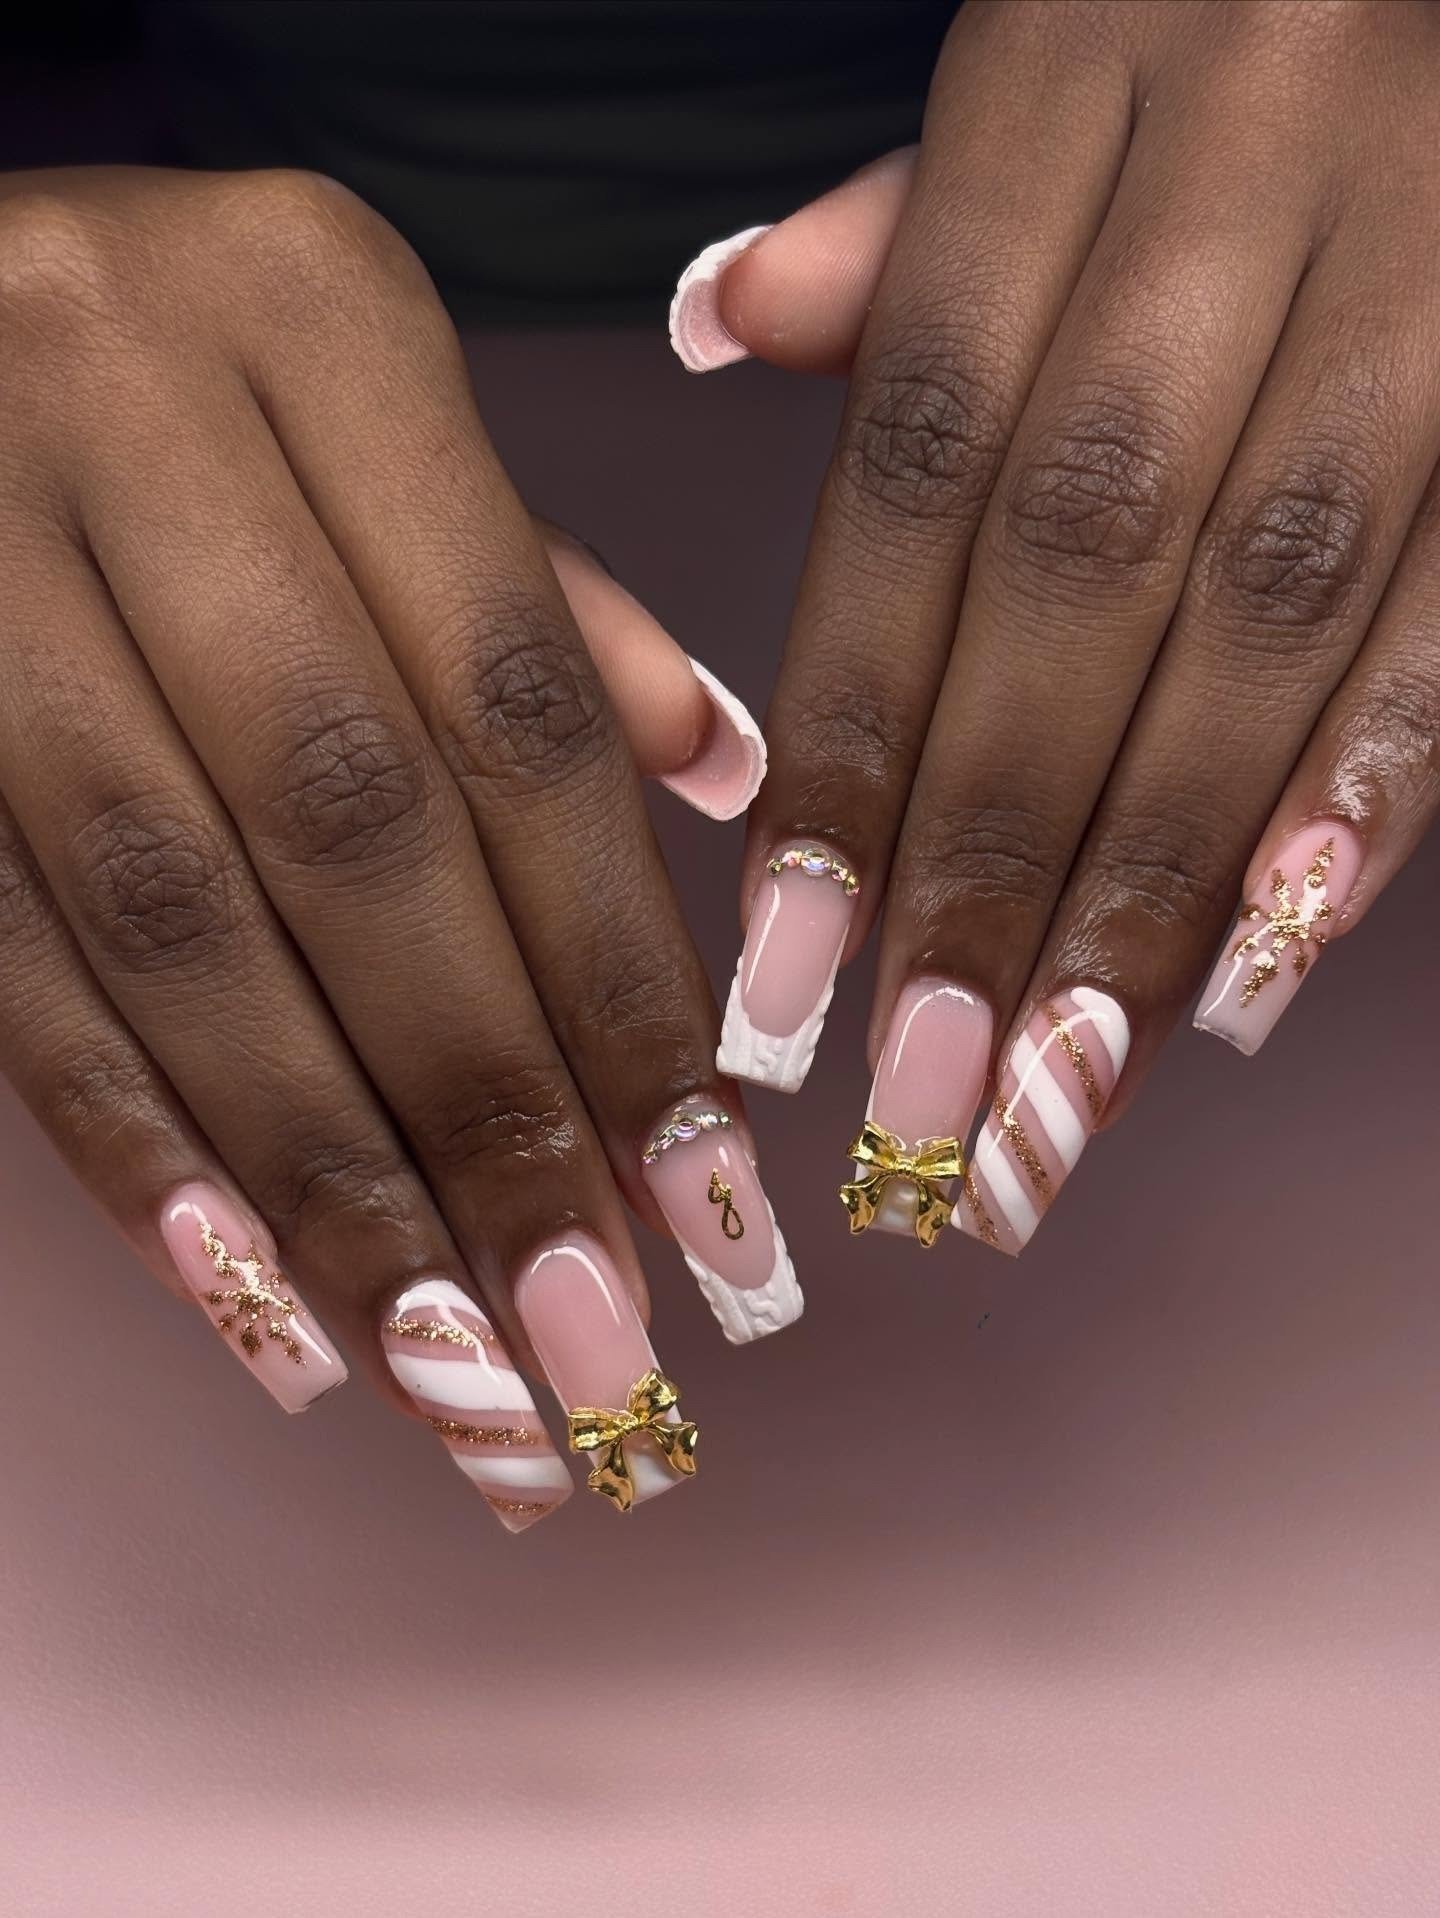
Golden bow glam accents are made for evenings, parties and the festive season. Picture soft pink and milky white bases with shiny gold 3D bow charms that catch the light every time you move your hands, finished with delicate gold snowflake details and white-and-gold candy stripes. The combination feels luxurious and celebratory, like jewellery for your nails. You can paint the bows with gold chrome powder or metallic nail polish, or use ready-made gold bow charms for extra dimension. This design looks stunning on long square or almond nails, where the pale base gives the gold room to glow. If your calendar is full of dinners, weddings or holiday events, these bow nails will not let you down. The metallic detail elevates even the simplest outfit, so your nails do the talking when the dress code is understated.
To create the gold effect, you have two easy options. For painted bows, use a metallic gold polish with a detail brush, building the colour in two thin layers for full opacity. For a true chrome finish, apply gold chrome powder over a no-wipe top coat with a silicone tool, then seal carefully. Keep the bows centred on each nail or place one larger bow on each ring finger as a statement. Because metallics show every flaw, make sure your base colour is perfectly smooth first. Finish with top coat, and prepare for compliments all night long. Whichever method you choose, work in good lighting so you can see the metallic coverage clearly. Gold can look patchy under dim bulbs, and a quick check in daylight before sealing will save you from disappointment later.
Pastel Coquette Bow Mix
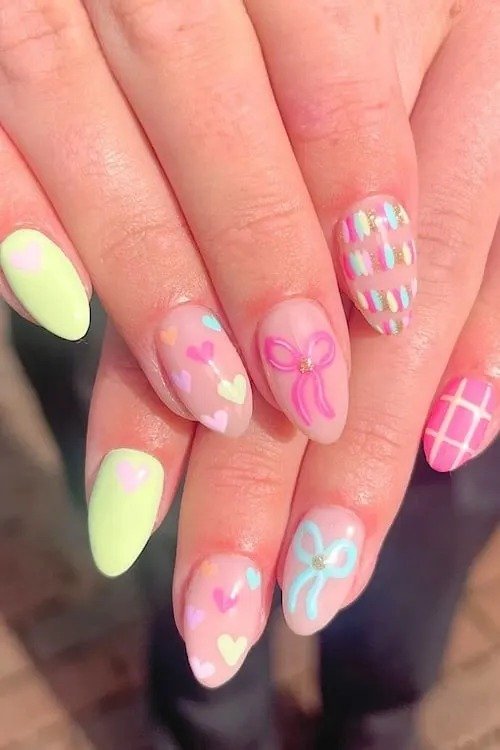
The pastel coquette bow mix is the playful, candy-coloured cousin of the classic bow manicure. Each nail gets a different pastel shade, think baby pink, sky blue, lilac, mint and lime, with tiny pastel bows and hearts painted on top. The result is cheerful and youthful, perfect for spring and summer or whenever you need a mood lift. This is one of the most fun bow nails designs to wear because every nail feels like a little surprise. It also looks adorable on short, rounded nails, where the pastel palette keeps everything sweet and cohesive. This rainbow approach is also a great way to use up pastel polishes that might feel too pale on their own. Together, the shades create a harmonious candy effect that makes these bow nails feel cheerful rather than chaotic, and the white bows tie everything together.
The secret to making mismatched pastels look intentional is keeping the bows consistent. Choose bows in a single colour, such as white or soft cream, and paint them in the same size and position on every nail. This unifying detail pulls the whole manicure together. Use pastel polishes with good opacity, applying two to three thin coats for even coverage. If freehand bows feel tricky at this scale, try tiny bow nail stickers as a shortcut; they look just as cute. Seal with a glossy top coat, and you have a manicure that is pure joy. Take your time with the base colours, since neat cuticle lines matter even more when every nail is a different shade. A cleanup brush dipped in acetone is your best friend for achieving that crisp, salon-quality edge.
Bow French Tip Designs
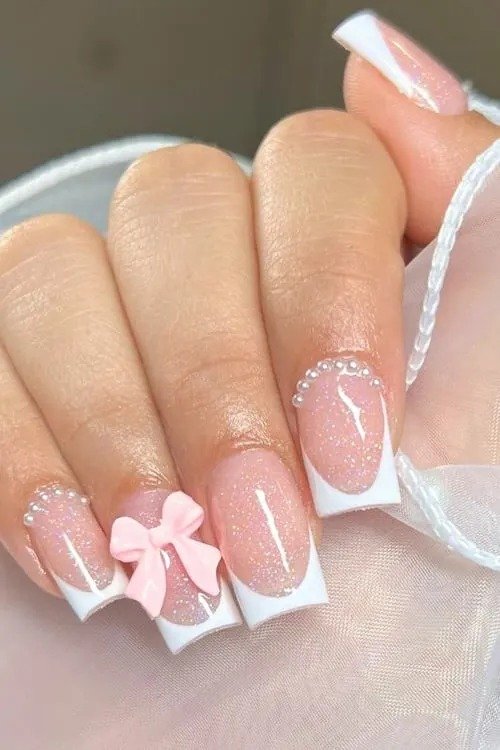
Bow French tip designs combine two timeless trends in one dreamy manicure. The classic French tip gets a romantic upgrade with a small bow placed right where the tip meets the base, usually on the smile line. You can keep it traditional with white tips and a white bow, or play with colour: pink tips with a red bow, or nude bases with chocolate tips and a cream bow. This style flatters every nail shape and length, and it is a favourite for brides, bridesmaids and anyone who wants elegance with a twist. For more French inspiration, browse our pink French nails ideas to pair with this look. The bow placement draws the eye to the smile line, which makes nails look longer and more sculpted. It is a clever little optical trick that works on every length, and it gives the classic French a fresh, modern personality.
Start with your French tips as usual, whether you freehand them or use guides for crisp lines. Let the tips dry completely before adding the bow, since smudging is the biggest risk here. Paint a petite bow straddling the smile line on each nail, or just on accent fingers for a subtler take. A detail brush and a steady hand are all you need, and keeping the bow small ensures the French tip stays the star. Finish with a glossy top coat for that classic salon shine. These bow nails are romantic, polished and endlessly photogenic. For extra staying power, wrap the top coat slightly under the free edge to seal the tips. This simple step prevents the most common chipping and keeps your French tips looking freshly done for well over a week.
Dark Coquette Bow Manicure
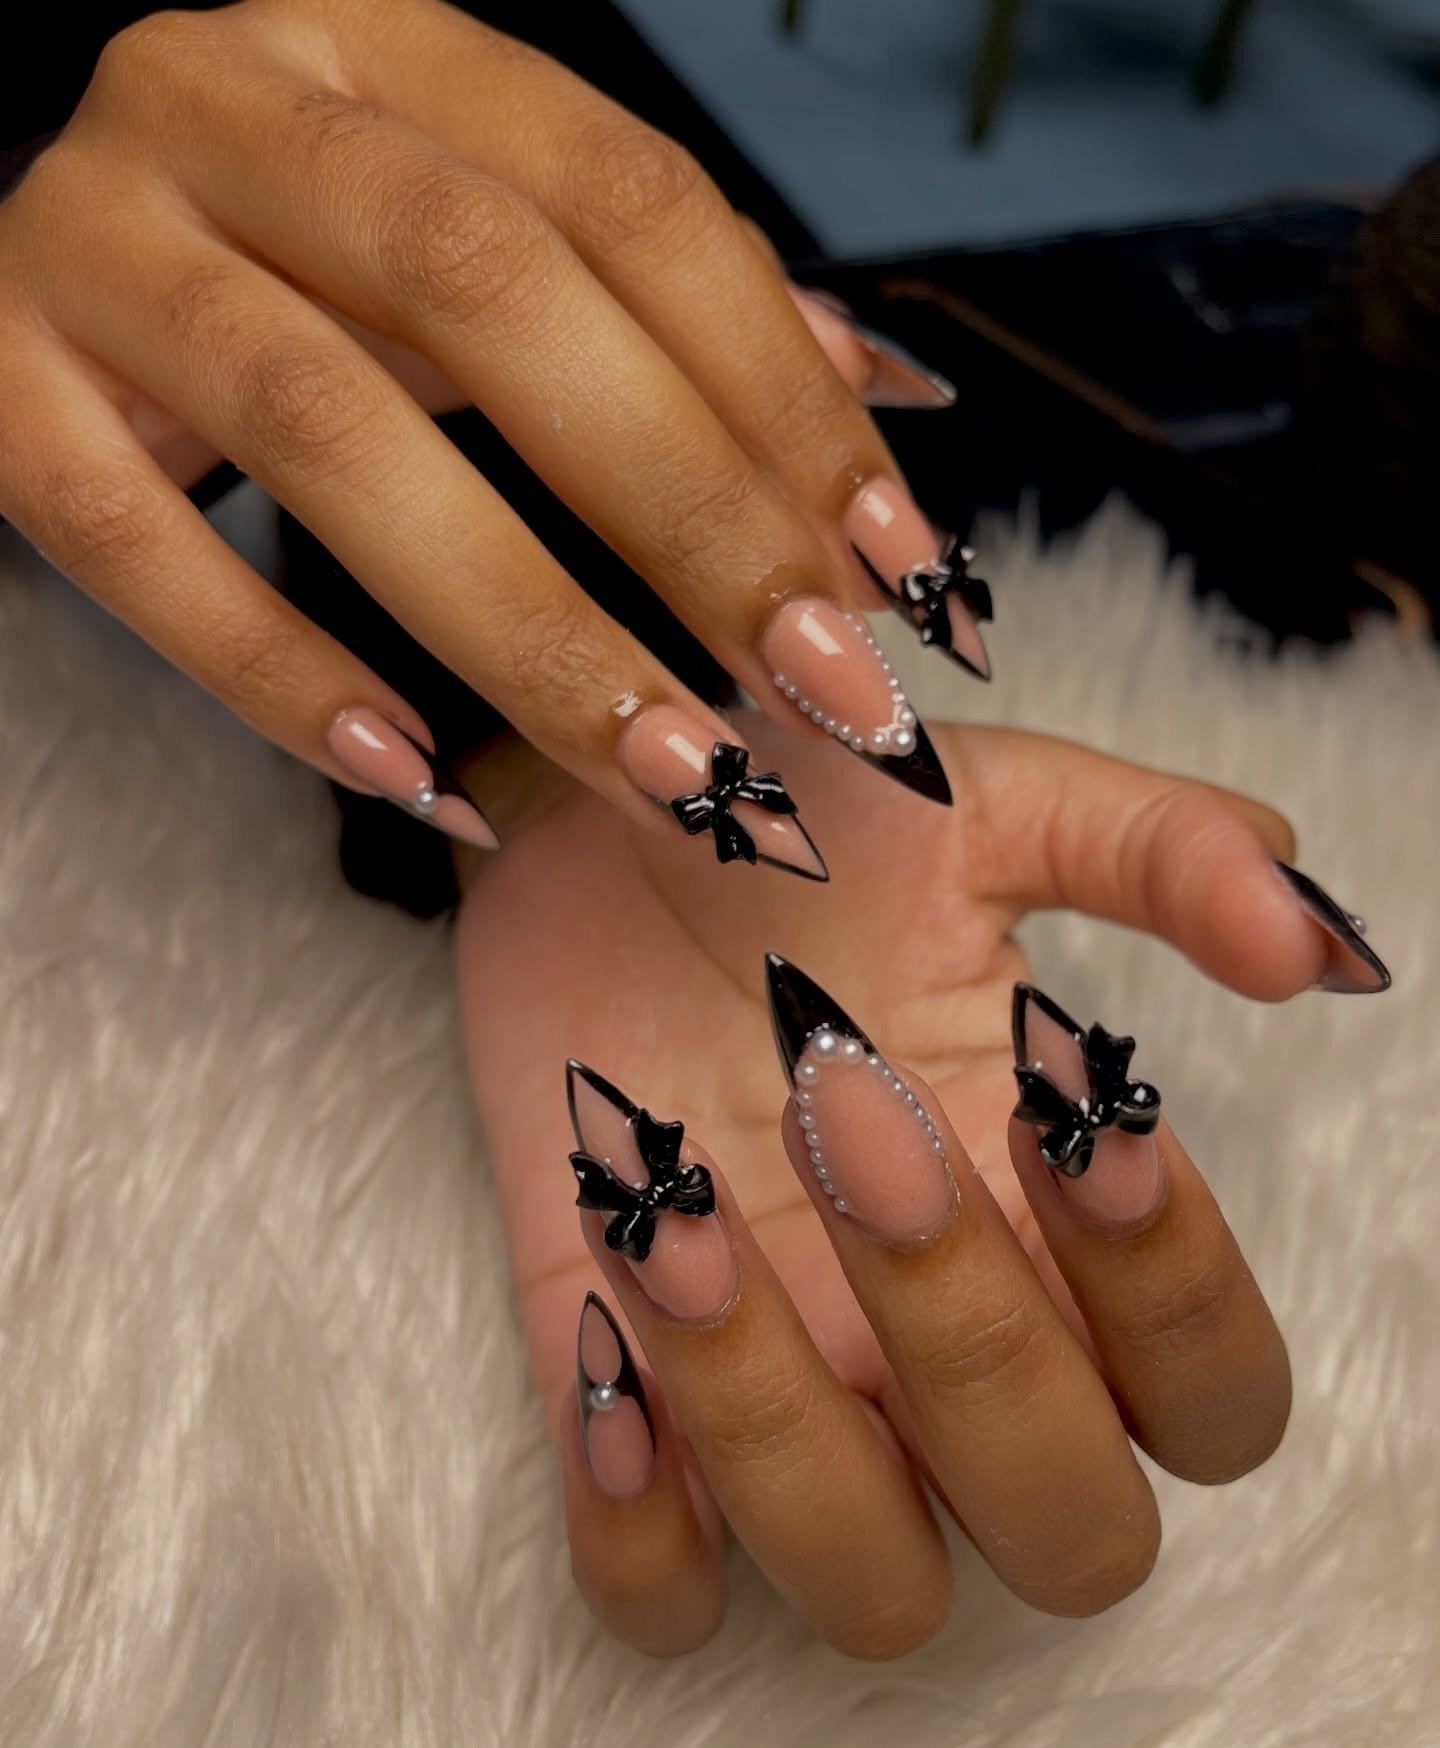
The dark coquette bow manicure is for anyone who loves feminine details with a moody twist. Glossy black 3D bows paired with black French tips and pearl accents on a soft nude base create a gothic-romantic look with real drama. This is coquette nails after dark: still pretty, still detailed, but with an edge that feels very 2026. It is a brilliant choice for autumn and winter, and it looks incredible on long almond or stiletto shapes. If pastel bows feel too sweet for you, this darker take on bow nails might be your perfect match. The deep black details make the bow shapes pop in a way that pastels cannot, giving the design real depth. This is the bow manicure for anyone who loves romance with an edge, and it transitions seamlessly from day to night.
Dark details need extra care to look luxe rather than flat. Apply your nude base evenly and clean up the cuticle line carefully, since the black French tips show every mistake. Attach the black bow charms with nail glue or builder gel, then add tiny pearls along the smile line for a jewellery-like finish. Keep the bows neat and evenly sized, and consider adding them to every nail for a bold look or just accents for subtlety. A glossy top coat is essential here; it gives the black details their rich, glassy depth. Moody, romantic and unforgettable. Pair this manicure with dark lipstick or smoky eyes for a fully coordinated moody look. The nude base is forgiving with regrowth too, so dark bow nails stay looking fresh for longer.
Bow Nails FAQs
How do you paint bows on nails for beginners?
Start with a fine detail brush and keep the design tiny. Paint two small triangles for the bow loops, add two short tails underneath, and finish with a dot in the centre. Practise on a nail wheel or piece of paper first, and work with a polish that is not too thick. If freehand feels too tricky, bow nail stickers or water decals give the same cute result with zero stress. A steady hand and patience matter more than talent here.
Do 3D bow charms damage your nails?
Not when they are applied and removed correctly. Attach charms with nail glue or builder gel on top of your polish, never directly on the bare nail plate. When it is time for a change, soak the nails in acetone as you would for regular gel removal, and the charms will lift off gently. Avoid picking or pulling them off, since that can peel layers of your natural nail. With proper care, charms are completely safe.
What nail shape suits bow nail designs best?
Bow designs are wonderfully versatile and suit almost every shape. Almond and oval nails give bows an elegant, elongated canvas, while short square or rounded nails keep the look cute and dainty. Long coffin or stiletto shapes can handle bigger, bolder bows and 3D charms. The only real rule is proportion: keep bows smaller on short nails so the design does not feel crowded, and let them grow with longer lengths.
How long do bow nails last?
Painted bow designs last as long as your underlying manicure. With regular polish, expect five to seven days; with gel polish, two to three weeks of wear is normal. 3D bow charms usually survive the full life of a gel manicure if you avoid using your nails as tools. Always seal painted art with a quality top coat and reapply it every few days to extend the life of your bow nails.