15 Cherry Red Nail Ideas: Pinterest’s 2026 Breakout Shade
Introduction
Pinterest Predicts has officially crowned cherry red nails as the breakout shade of 2026, and the manicure world is listening — this is the juicy, true-cherry red with cool depth that photographs beautifully and flatters every skin tone. It is bolder than burgundy, fresher than classic red, and endlessly wearable at any length. In the next three minutes, you will get fifteen polished ways to wear the trend: glassy solids, cherry French tips, blooming-gel florals, a chrome glaze finish, and chic short-square options. Whether you are booking a salon appointment or painting them yourself tonight, there is a cherry red manicure here with your name on it. And once you have picked your favorite, our 10 Fall Nails 2026 Trends roundup is the perfect next stop for your seasonal nail rotation.
Glossy Cherry Red Nails on an Almond Shape

Nothing says confident like a solid coat of glossy cherry red on a sleek almond shape. This is the purest expression of the trend: one rich, even color, a mirror-like shine, and an elongated silhouette that makes fingers look instantly elegant. Almond is the ideal partner for cherry red because the tapered tip keeps the bold color refined rather than loud, working beautifully on medium to long natural nails or extensions. It suits every skin tone, transitions effortlessly from office to evening, and photographs like a dream, which is exactly why your feed is full of it.
- Apply a ridge-filling base coat to create a perfectly smooth canvas.
- Layer two thin coats of a true cherry red gel or lacquer, not one thick coat.
- Seal with a high-gloss top coat and cure or dry fully for a glass finish.
- Ask your tech for a medium almond shape if your natural nails are on the shorter side.
For a salon visit, ask for “a solid cherry red gel manicure on a medium almond shape with a glass-finish top coat” — most techs will know exactly what you mean. At home, the secret is patience: thin coats, full drying time between layers, and a top coat reapplied on day three to extend wear. A gel version lasts two to three weeks with minimal chipping, while a quality lacquer gives you five to seven days of shine. Keep cuticles hydrated with daily oil so the bold color always looks intentional and fresh.
Classic Cherry French Tips
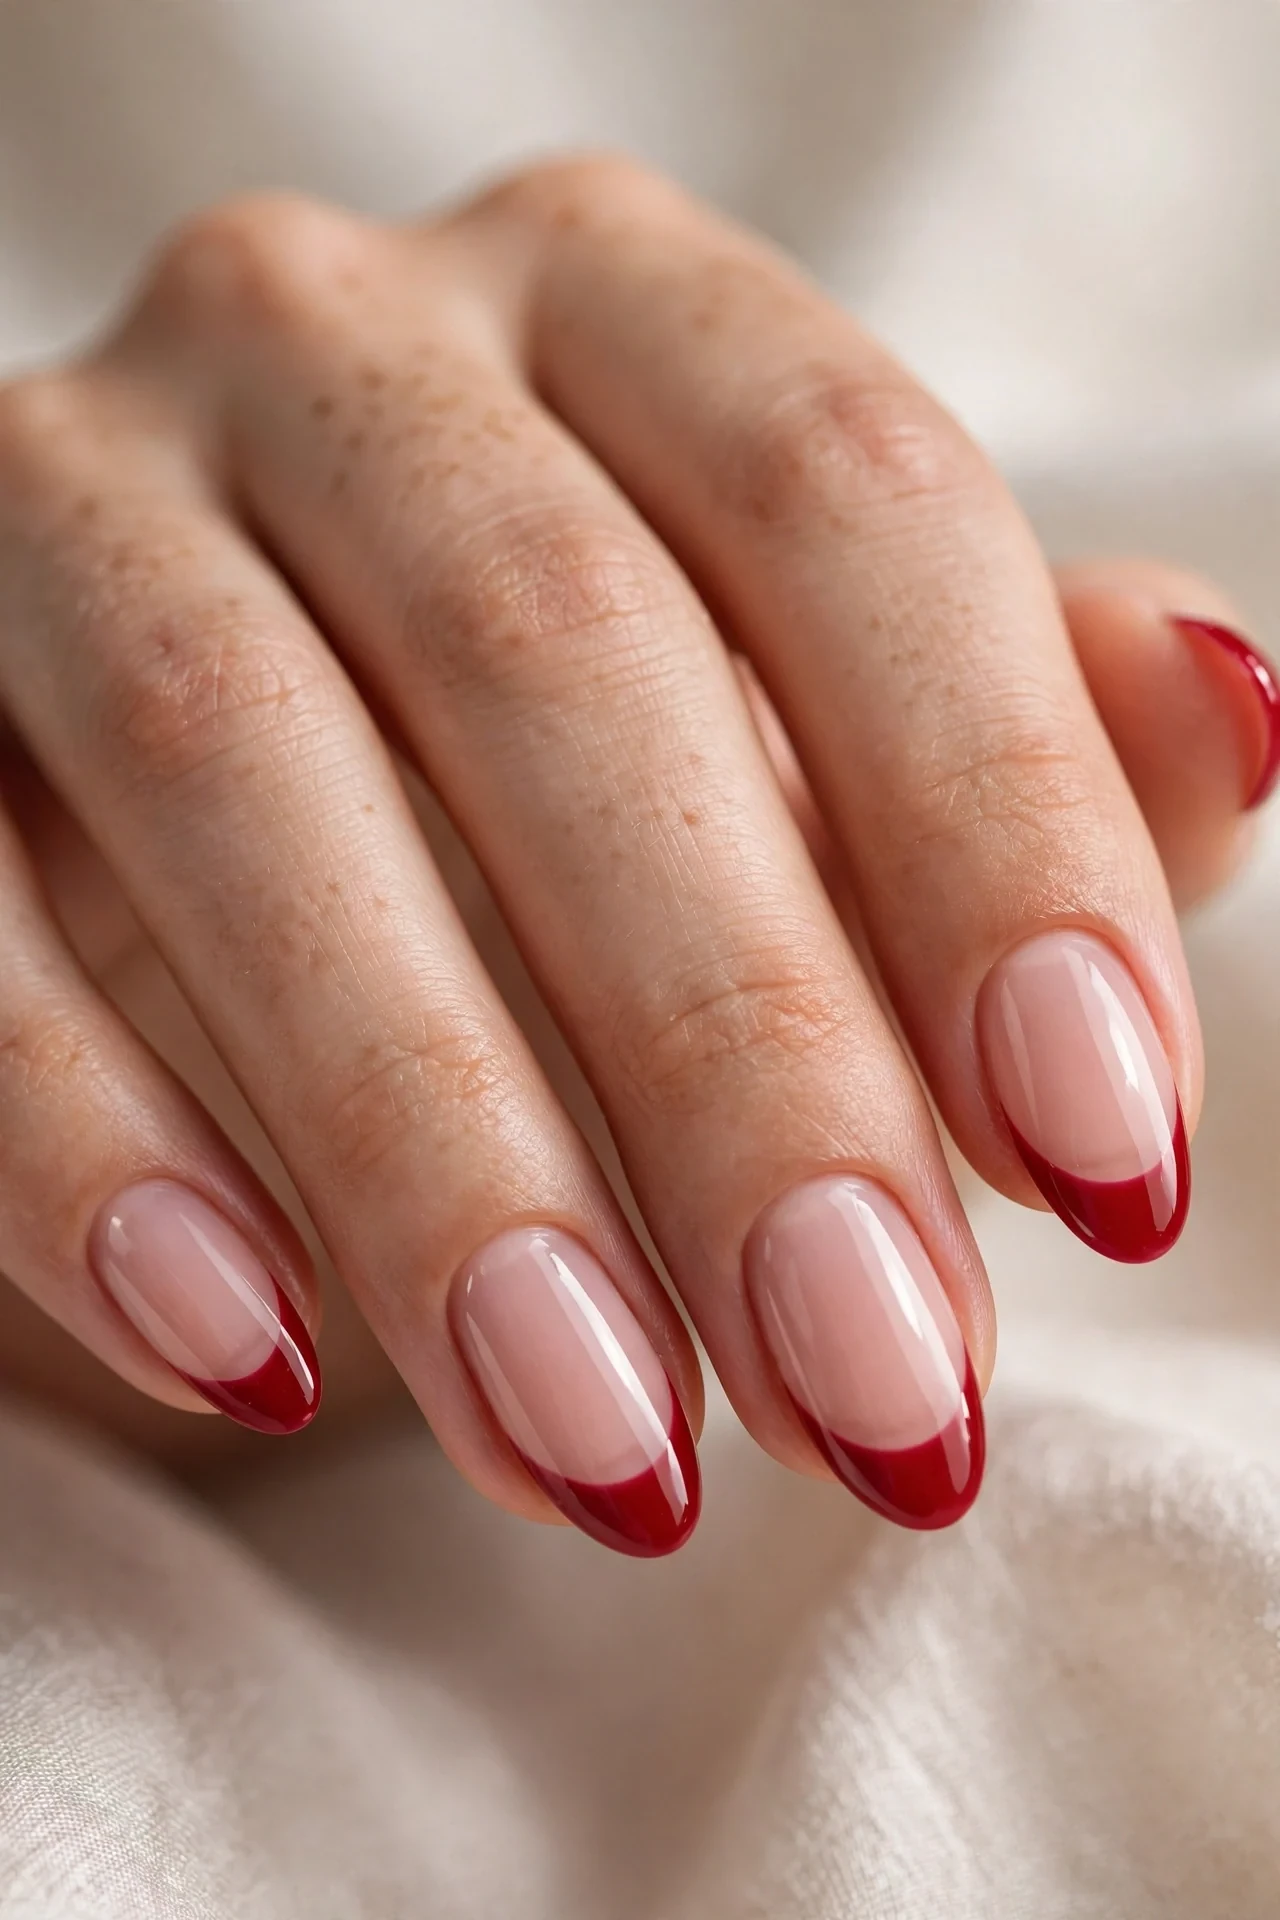
Cherry French tips take the timeless French manicure and give it a 2026 twist: crisp cherry red tips over a sheer pink or milky nude base. You get the clean, polished structure of a French with a playful pop of the season’s defining shade. This design is wonderfully versatile — it flatters short nails that cannot carry a full bold color, looks professional in conservative workplaces, and reads as both classic and current. The contrast between the soft base and the vivid cherry tip is what makes this one so photogenic.
- Start with a sheer nude or milky pink base on every nail.
- Paint the free edge with cherry red, keeping the smile line crisp.
- Clean up the curve with a flat brush dipped in acetone.
- Seal with a glossy top coat to blend the tip edge seamlessly.
In the salon, say “cherry red French tips on a sheer pink base” and specify whether you want a classic smile line or a deeper, more dramatic curve. For DIY, French tip guides or a silicone stamper make the smile line far easier — paint the tip, then refine the edge with cleanup brush before sealing. Wear time matches a standard gel French at two to three weeks. If tips start to wear, a thin reapplication of top coat buys you several more days without a full redo.
Cherry Micro French Lines
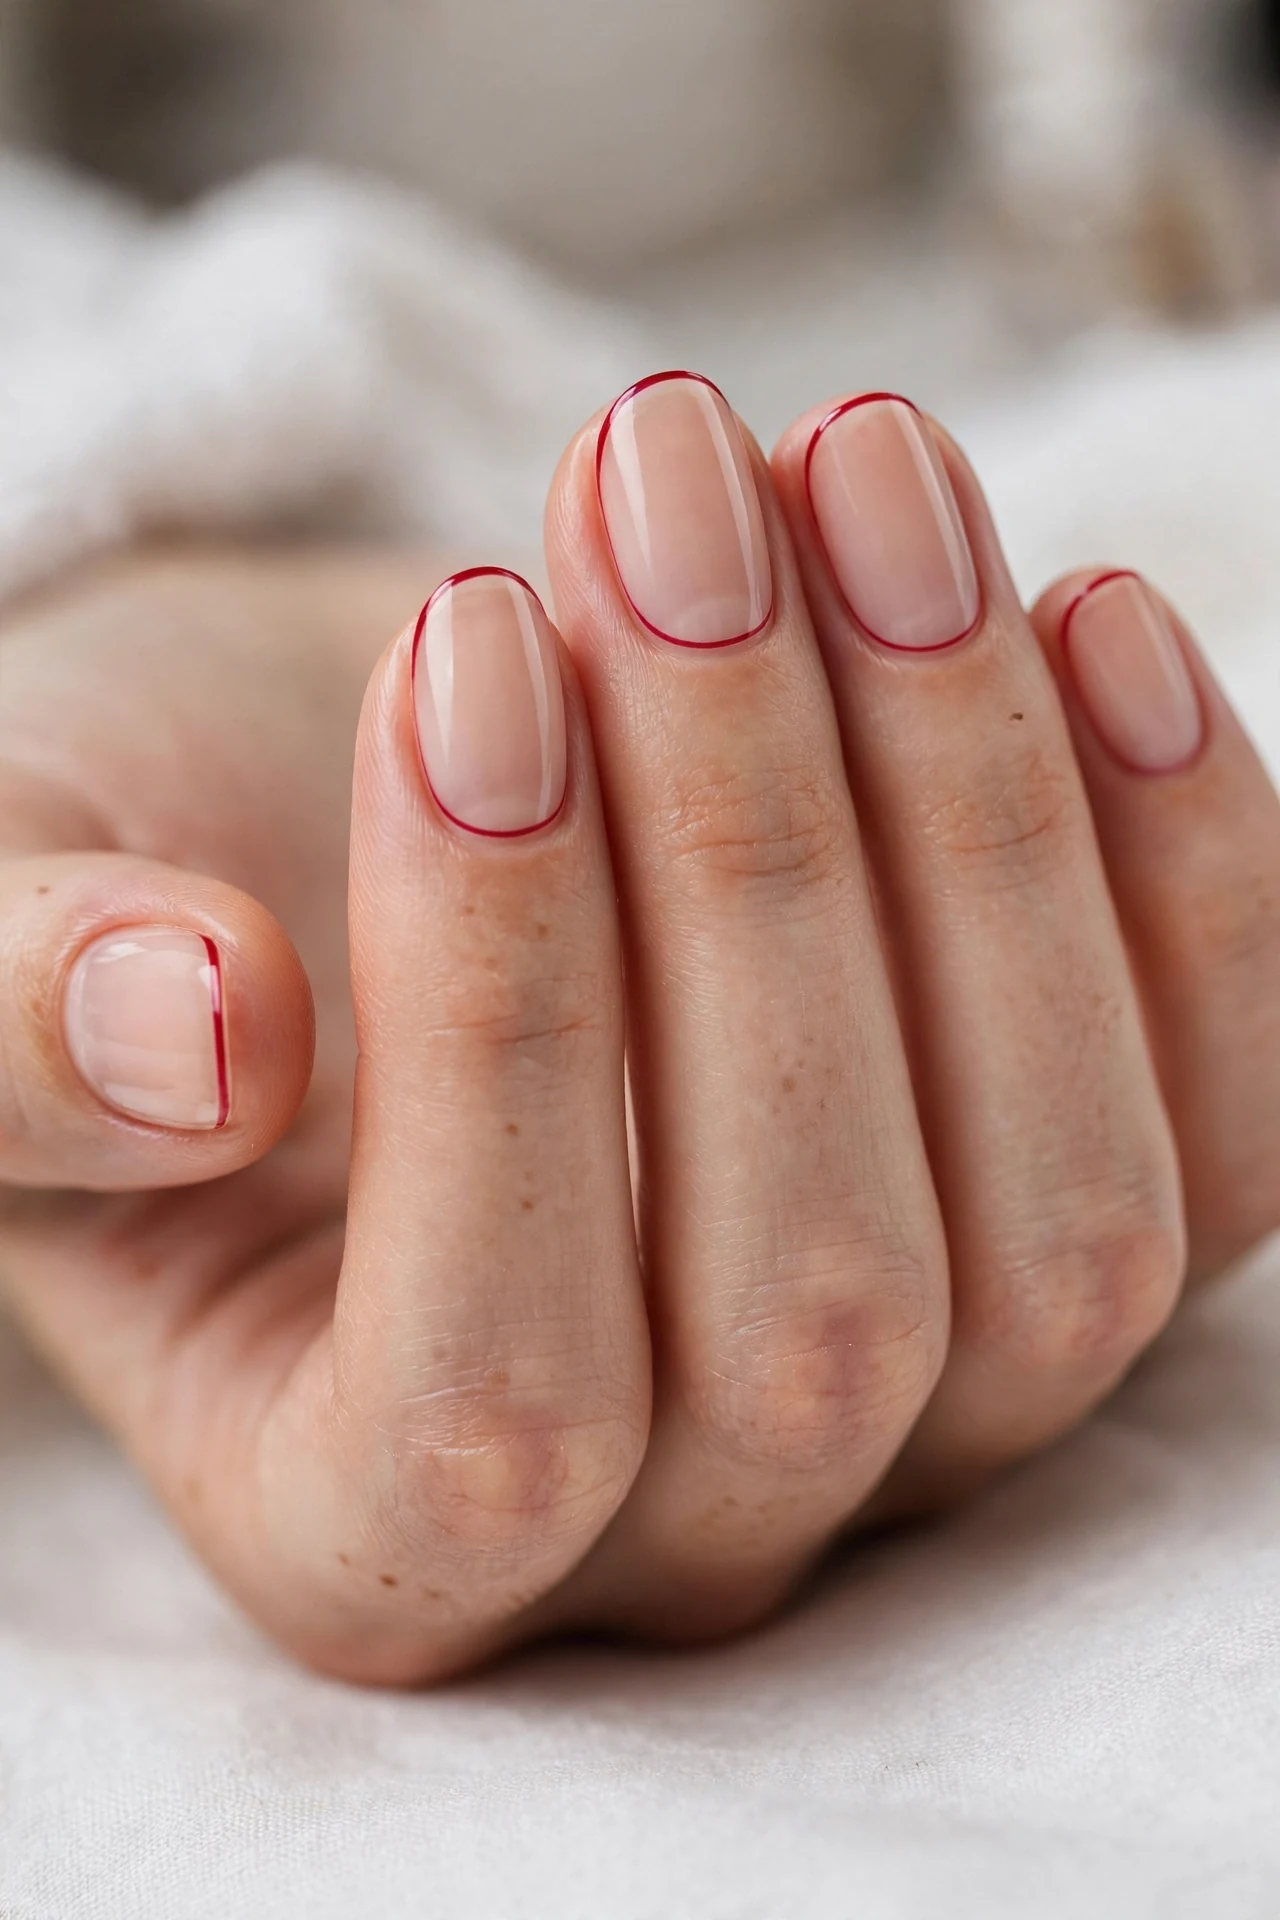
If a full French tip feels like too much, the micro French is your answer: a whisper-thin cherry red line tracing the very edge of the nail over a clean nude base. This minimalist take keeps the trend sophisticated and office-friendly while still nodding to the breakout shade. It works on every shape but looks especially chic on short, neatly filed nails where the thin line creates the illusion of length. Think of it as jewelry for your fingertips — subtle, precise, and quietly luxurious.
- Shape nails into a soft square or squoval for the cleanest canvas.
- Apply two coats of a skin-flattering nude base color.
- Draw a hairline cherry red edge with a long, thin detail brush.
- Seal everything under a glassy top coat for durability.
Ask your nail tech for “a micro French with a fine cherry red line” — the key word is micro, which signals the ultra-thin width. At home, steady your painting hand by resting your pinky on the table and rotate the finger rather than the brush. Gel is worth it here since the fine line is vulnerable to chipping; expect two to three weeks of wear. Refresh the top coat weekly and this minimalist design stays pristine longer than almost any other nail art.
Blooming-Gel Cherry Blossoms
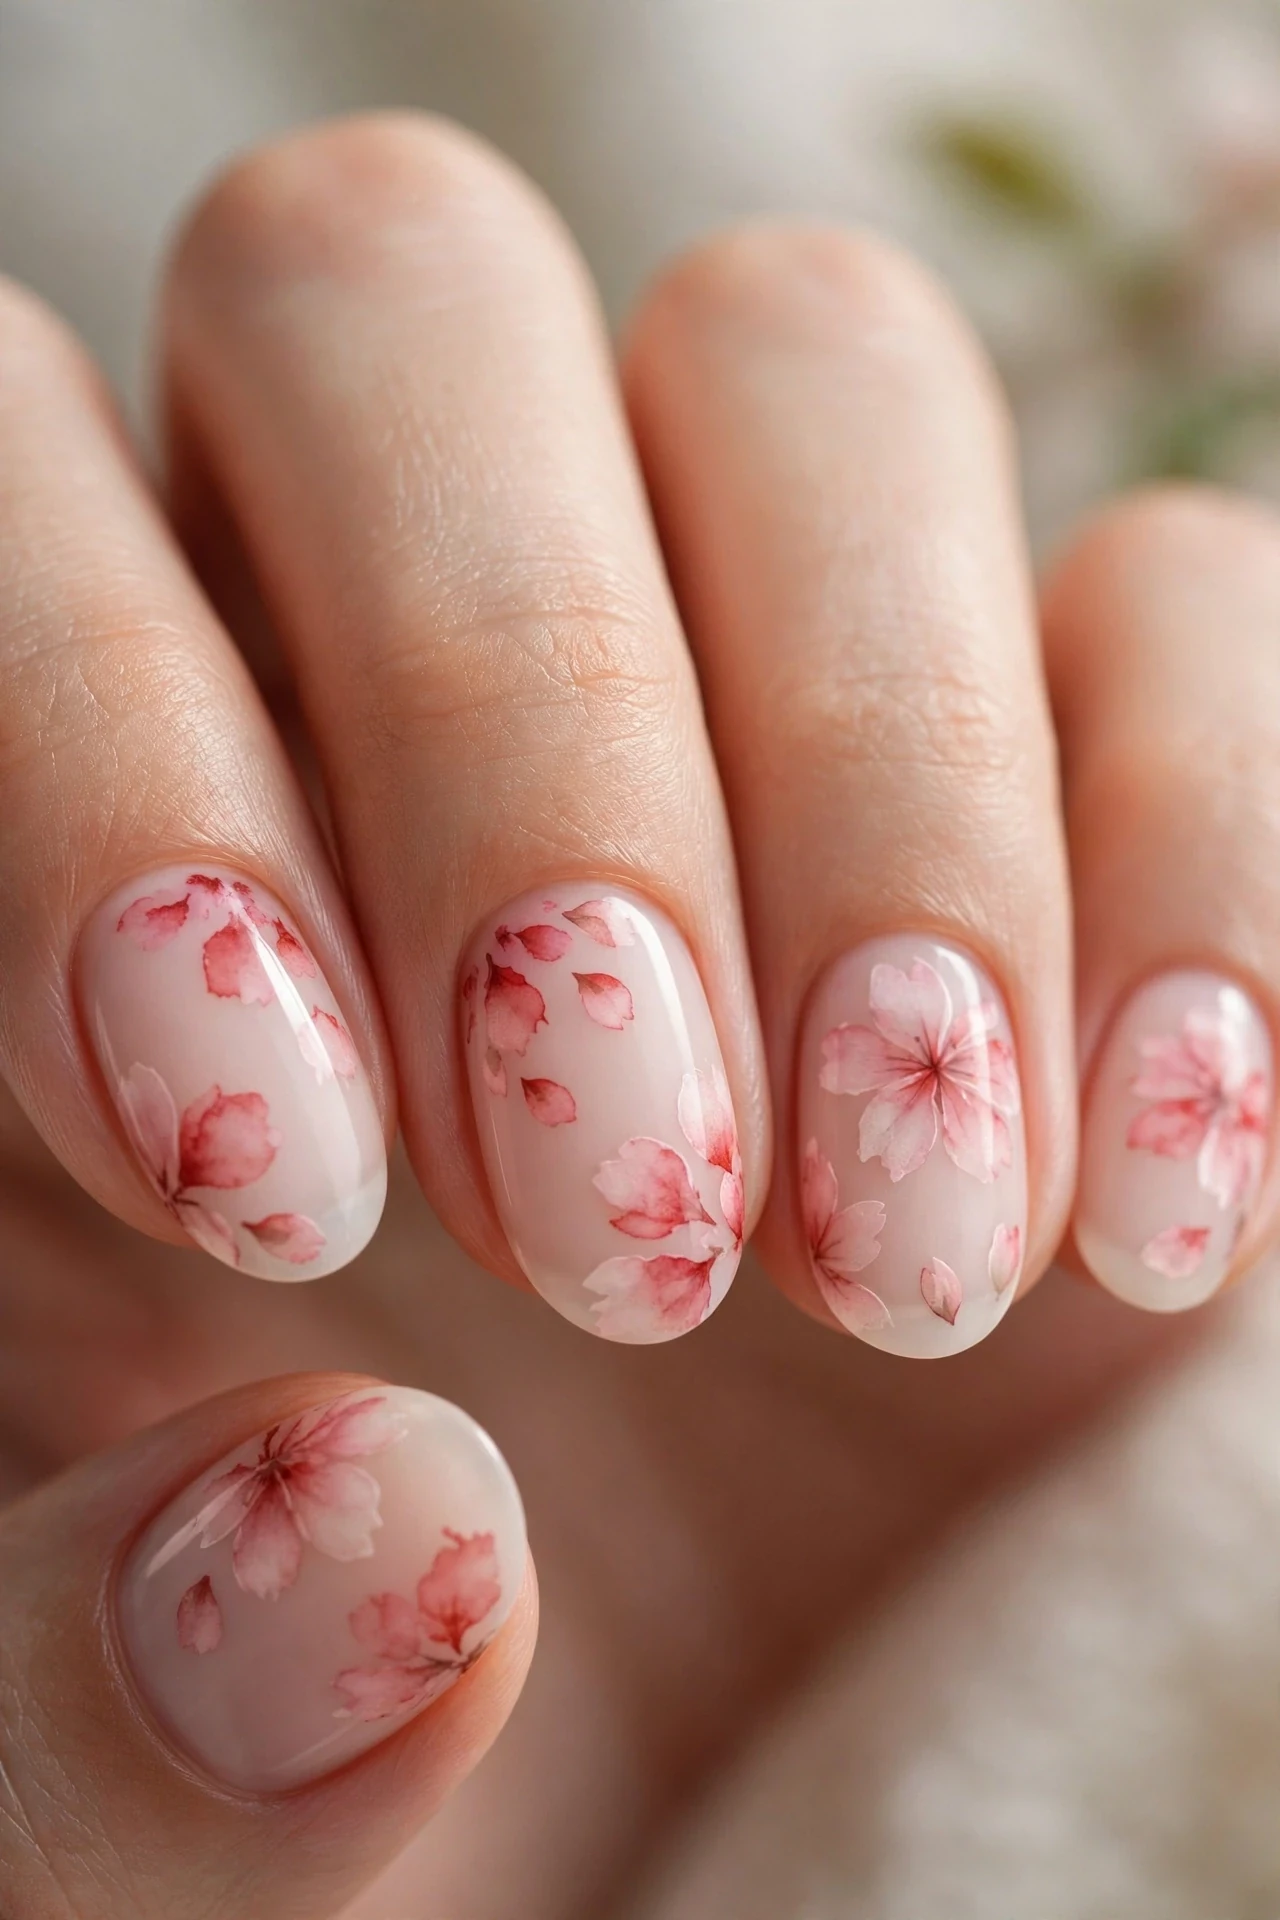
Blooming gel turns cherry red polish into soft, watercolor florals that look hand-painted by an artist. On a milky or nude base, drops of cherry red bloom outward into delicate petals — no two nails alike, every set one of a kind. This is the romantic, feminine corner of the cherry red trend, perfect for spring weddings, date nights, or anyone who finds solid red a little intimidating. The diffused edges keep the bold color dreamy rather than intense, so it wears beautifully on medium and long nails.
- Apply your nude or milky base color and cure it completely.
- Brush on a layer of clear blooming gel — do not cure yet.
- Dot cherry red polish into the wet gel to form petal shapes.
- Watch the color bloom, then cure once you love the spread.
This is a salon-friendly request: “cherry red blooming-gel florals on a nude base” — and if your tech is new to the technique, the trend coverage at Pinterest Predicts cherry red shows just how mainstream these cherry designs have become. DIY is genuinely doable: work one nail at a time, keep the blooming layer wet while you dot, and cure quickly once the petals look right. Add a tiny gold center dot for extra detail. Wear time runs a full two to three weeks in gel, and the organic design hides minor chips better than solid color.
Cherry Glaze Chrome
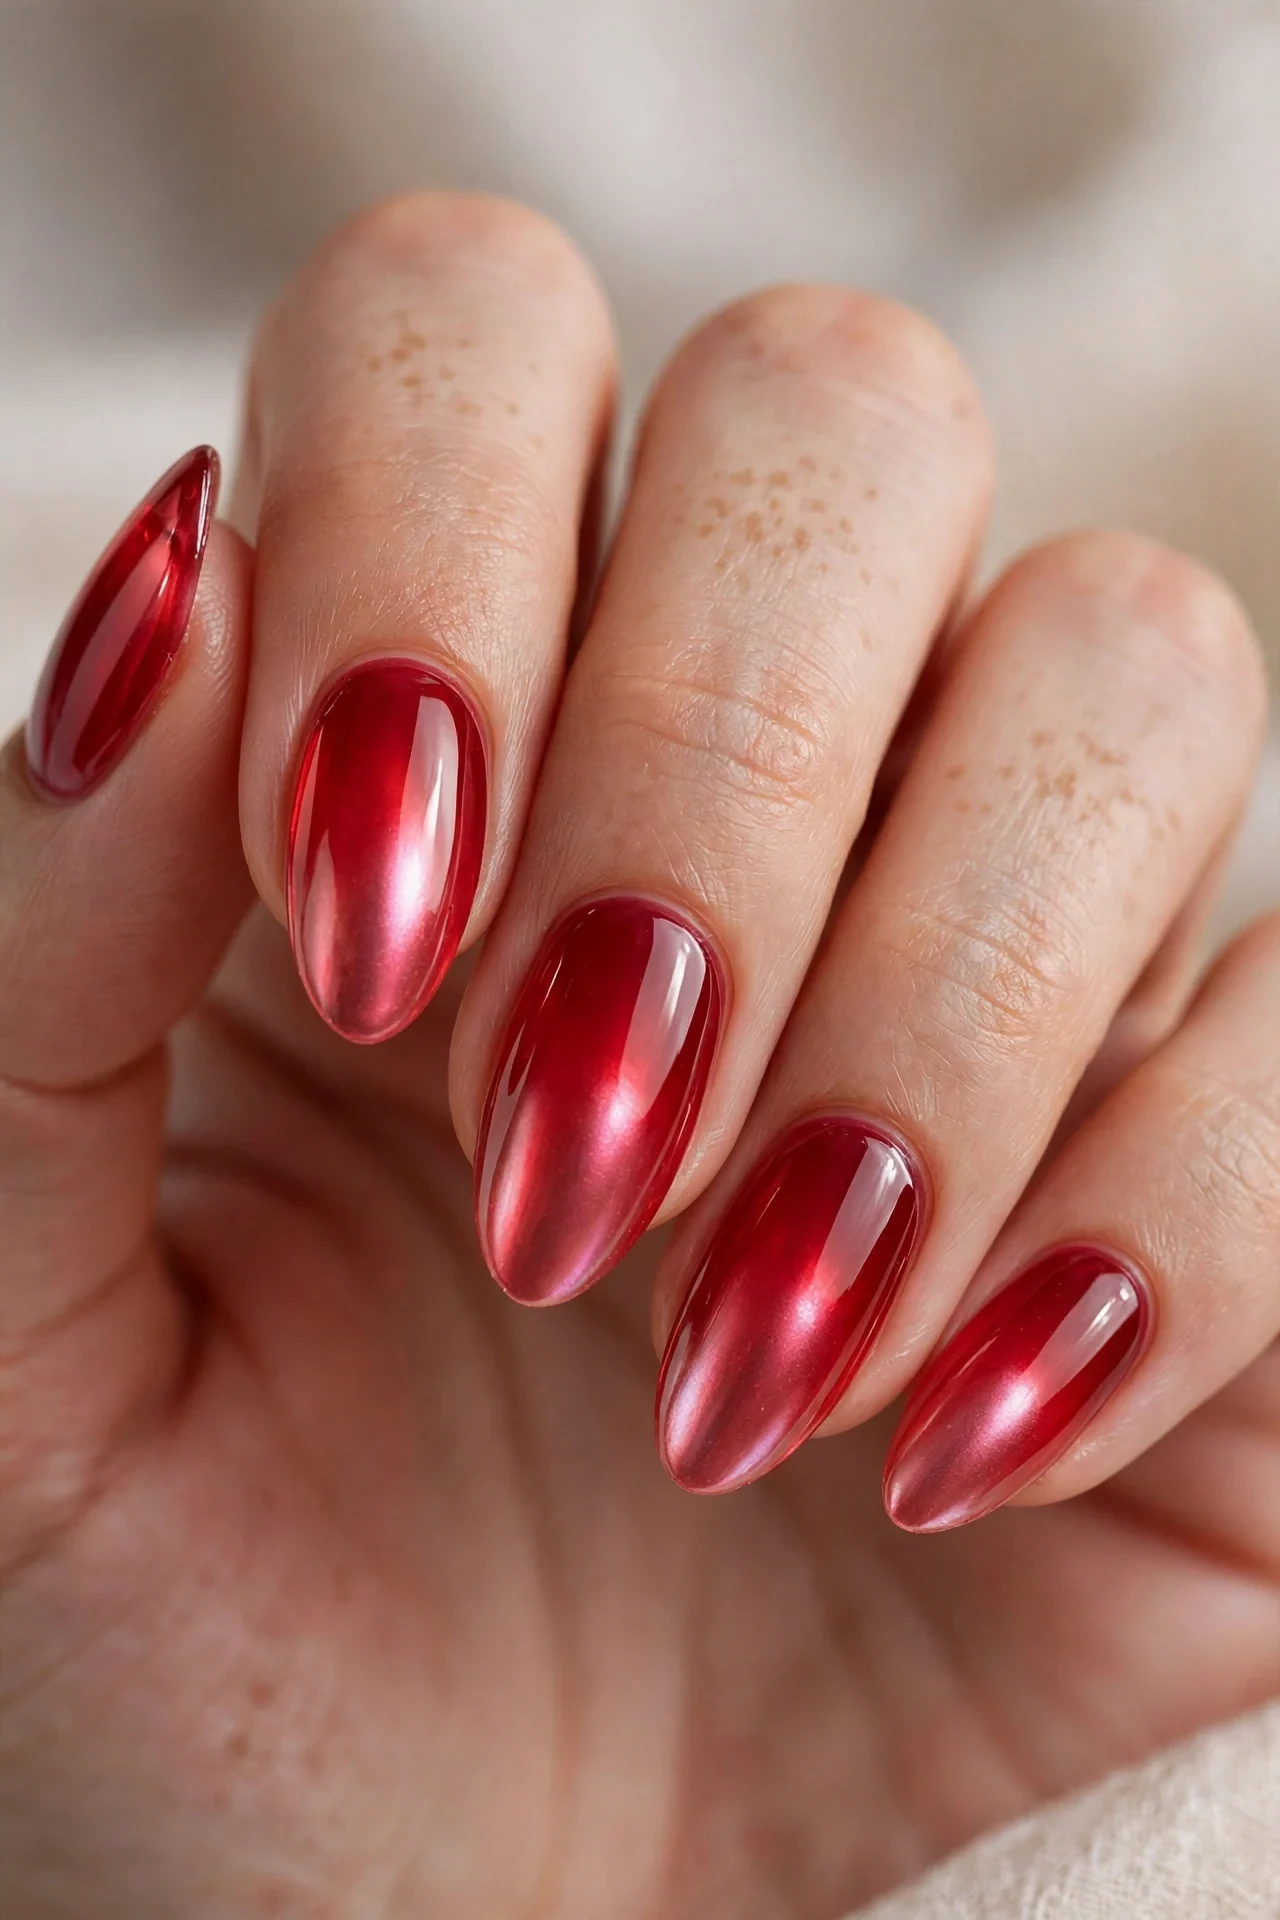
The cherry glaze mani layers a translucent cherry red over a chrome or glazed base for a lit-from-within, syrupy finish — think glazed donut nails, but in 2026’s signature shade. The chrome underlayer catches light as you move your hands, giving the red incredible depth and dimension that flat polish cannot match. This is the showstopper option: maximum shine, maximum compliments, and it looks stunning on almond and coffin shapes where the curved surface shows off the glow. Fair to deep skin tones all carry this beautifully.
- Apply a sheer nude or pink base and cure fully.
- Rub a pearl or white chrome powder over a no-wipe top coat.
- Layer a sheer cherry red jelly polish over the chrome.
- Finish with a high-gloss top coat to lock in the glow.
Tell your tech “cherry glaze chrome — chrome powder under a sheer cherry jelly” and they will know the layering order. The DIY version needs chrome powder, a no-wipe top coat, and a jelly red polish — apply chrome with a sponge applicator, dust off excess, then float the jelly color over it. Two thin jelly coats give the richest syrup effect. Expect two to three weeks of gel wear. Handle the chrome gently during application; fingerprints in the powder layer show through the sheer red.
Short Square Cherry Reds

Proof that you do not need long nails to wear a statement shade: cherry red on short, neatly squared nails is bold, modern, and completely practical. The compact shape keeps the vivid color grounded and wearable — this is the version for keyboards, workouts, and busy hands. Short squares also make cherry red feel fashion-forward rather than formal, and the strong straight edge gives the color a crisp, graphic finish. If you have been avoiding red because your nails are short, this idea was made for you.
- File nails into a clean square with softly rounded corners.
- Push back cuticles to maximize the visible nail plate.
- Apply two thin coats of cherry red lacquer or gel.
- Finish with a glossy top coat and cap the free edge.
At the salon, “short square cherry red gel, glass finish” is all you need to say. At home, this is one of the easiest ideas on the list — short nails mean faster application and fewer smudges. A regular lacquer works fine here and removes easily when you want a change; expect five to seven days. Reapply top coat on day three and moisturize cuticles nightly. The rounded corners prevent the snagging that square edges sometimes cause.
Cherry-to-Burgundy Ombré

The cherry-to-burgundy ombré melts bright cherry red at the cuticle into a deep, moody burgundy at the tip — or reverse it for a different mood. This gradient gives you two trending shades in one manicure and creates gorgeous depth, especially on medium to long nails where the blend has room to breathe. It is the perfect bridge if you love cherry red’s energy but want something a touch more dramatic for evenings. The seamless fade looks airbrushed and expensive, and it flatters every skin tone.
- Apply a cherry red base coat on the full nail.
- Sponge burgundy polish onto the tip, blending upward.
- Dab lightly with a makeup sponge for a seamless gradient.
- Seal with two layers of glossy top coat to smooth the blend.
Ask for “a cherry red to burgundy ombré, airbrushed or sponged” — most techs achieve the smoothest fade with an airbrush, but sponging works beautifully too. DIY with a latex makeup sponge: paint both colors side by side on the sponge and dab onto the nail in thin layers, building gradually. Clean up the cuticles with acetone between layers. Gel versions last two to three weeks; the gradient cleverly disguises tip wear, often extending the fresh look a few extra days.
Cherry Red Nails with Gold Foil Accents

Cherry red and gold foil is the pairing that turns a simple manicure into something that looks straight off a holiday campaign — but it works year-round. Irregular flakes of gold leaf pressed over glossy cherry red catch the light with every gesture, adding texture and luxury without any complicated art. This design suits medium to long nails best, where the foil has space to scatter naturally, and it is a brilliant choice for events, parties, or anytime you want your hands to be the accessory. Each nail comes out unique, which is half the charm.
- Apply two coats of cherry red and leave the second coat slightly tacky.
- Press small pieces of gold foil onto the nail with tweezers.
- Gently smooth the foil with a silicone tool — do not overwork it.
- Encapsulate everything under two coats of glossy top coat.
Request “cherry red gel with scattered gold foil accents” and let your tech decide the placement — random scattering looks more expensive than symmetrical patterns. At home, gold foil sheets from any nail supply store tear easily into organic pieces; apply over a tacky layer so they grip, then seal generously since foil edges can lift. Expect two to three weeks of wear in gel. Avoid picking at the foil and wear gloves for heavy cleaning to protect the encapsulation.
Cherry Aura Effect
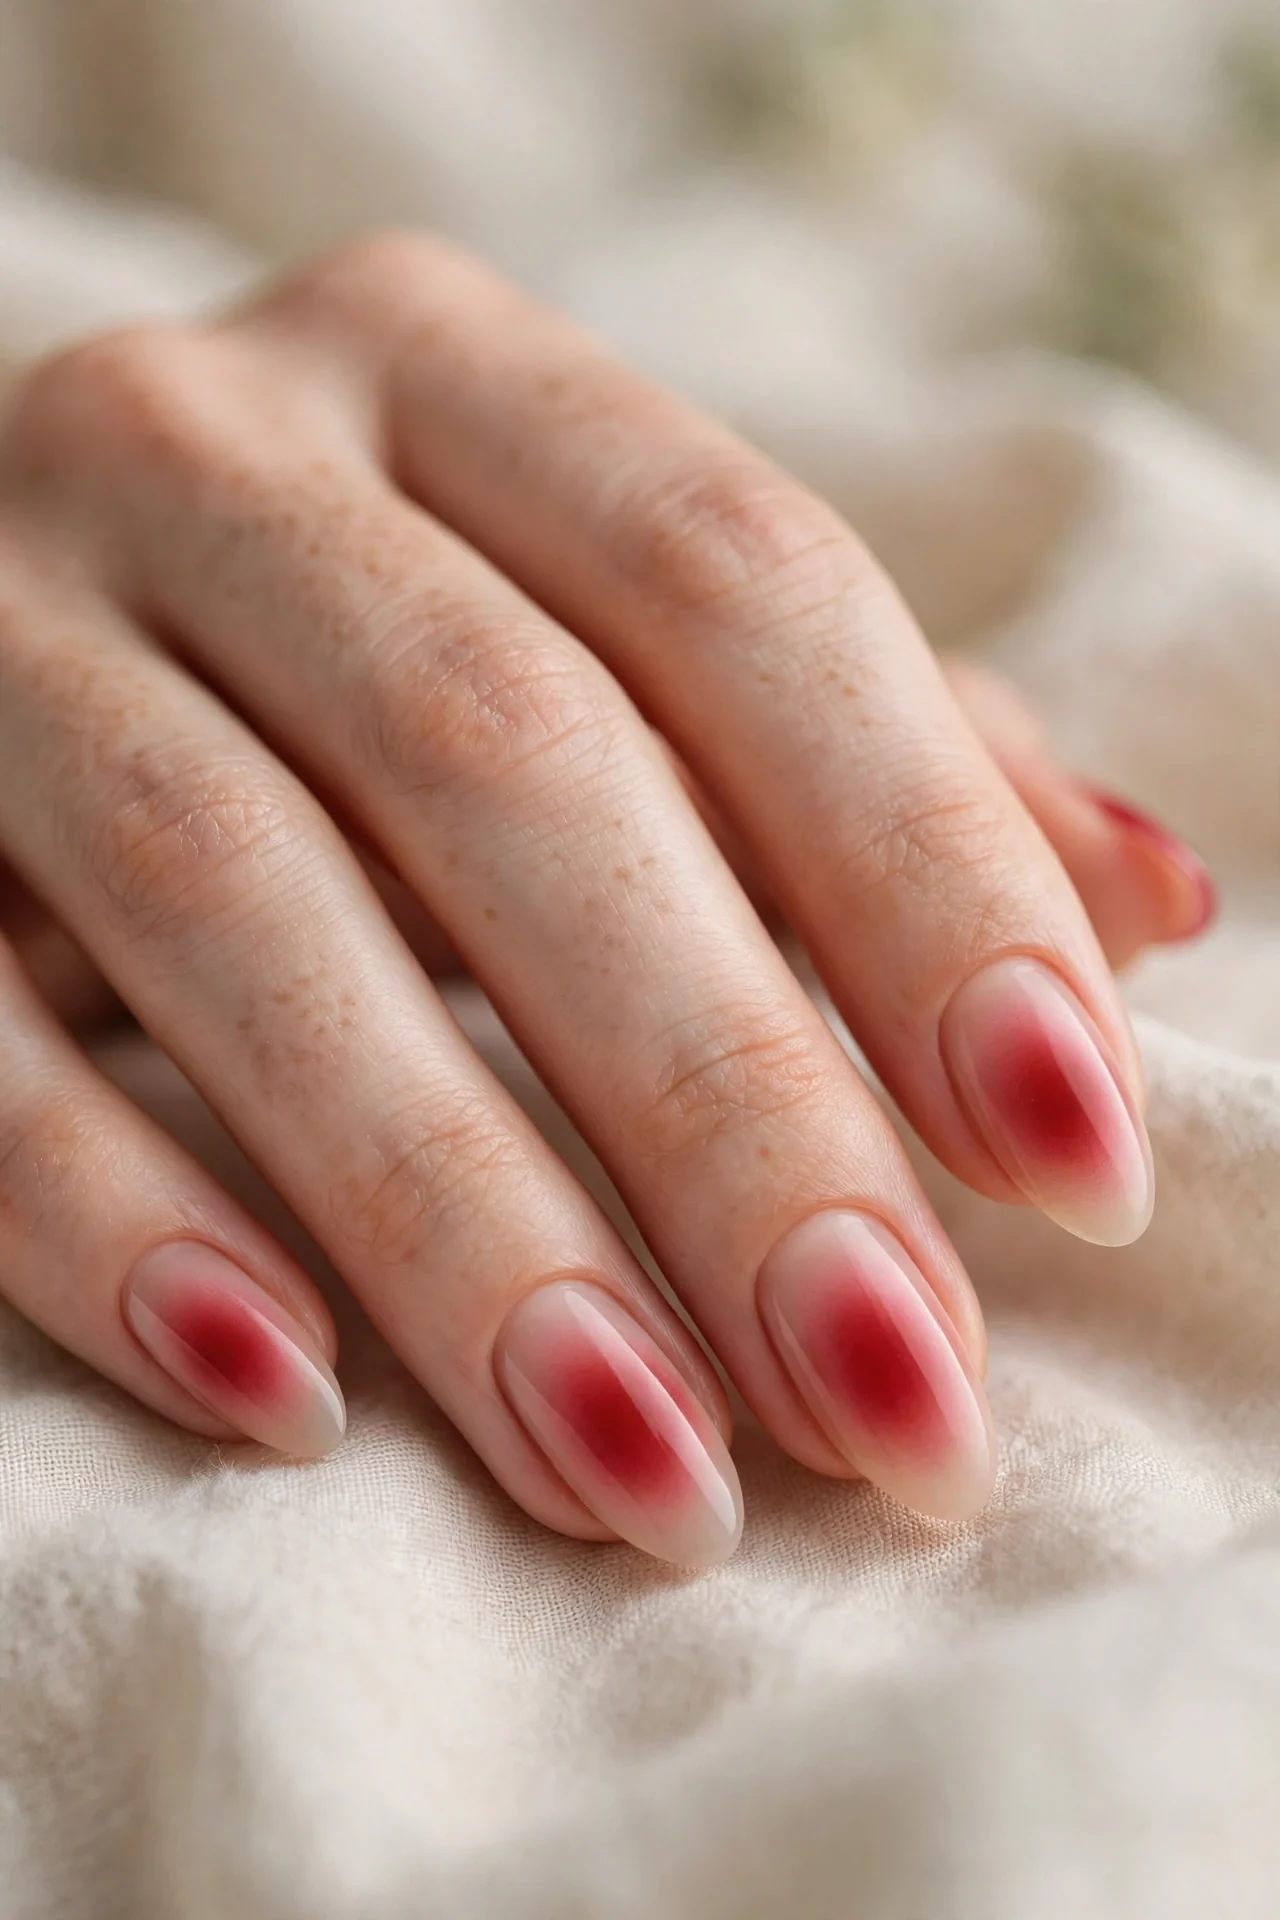
The aura manicure — a soft, diffused halo of color blooming from the center of the nail — looks absolutely dreamy in cherry red. The center glows with concentrated cherry pigment that fades into a sheer nude or milky base at the edges, like a blush for your nails. This is the softest, most artistic way to wear the breakout shade: romantic, modern, and endlessly photographable. It works on all lengths and shapes, but almond and oval nails show off the radial glow best. If you love nail art that feels like a mood, this is yours.
- Apply a sheer nude or milky base and cure it.
- Sponge concentrated cherry red pigment into the center of each nail.
- Blend outward in soft circular motions for the diffused halo.
- Seal with a glossy top coat to melt the edges together.
Say “cherry red aura nails on a nude base” — techs usually create this with an airbrush or a dense eyeshadow sponge. DIY with pigment powder or highly pigmented polish dabbed with a sponge; build the center color slowly since it is easier to add than to remove. Keep the halo centered and symmetrical across all ten nails for the most polished result. Gel wear runs two to three weeks. The diffused edges are forgiving, so small imperfections disappear into the blend.
Cherry Half-Moon Manicure
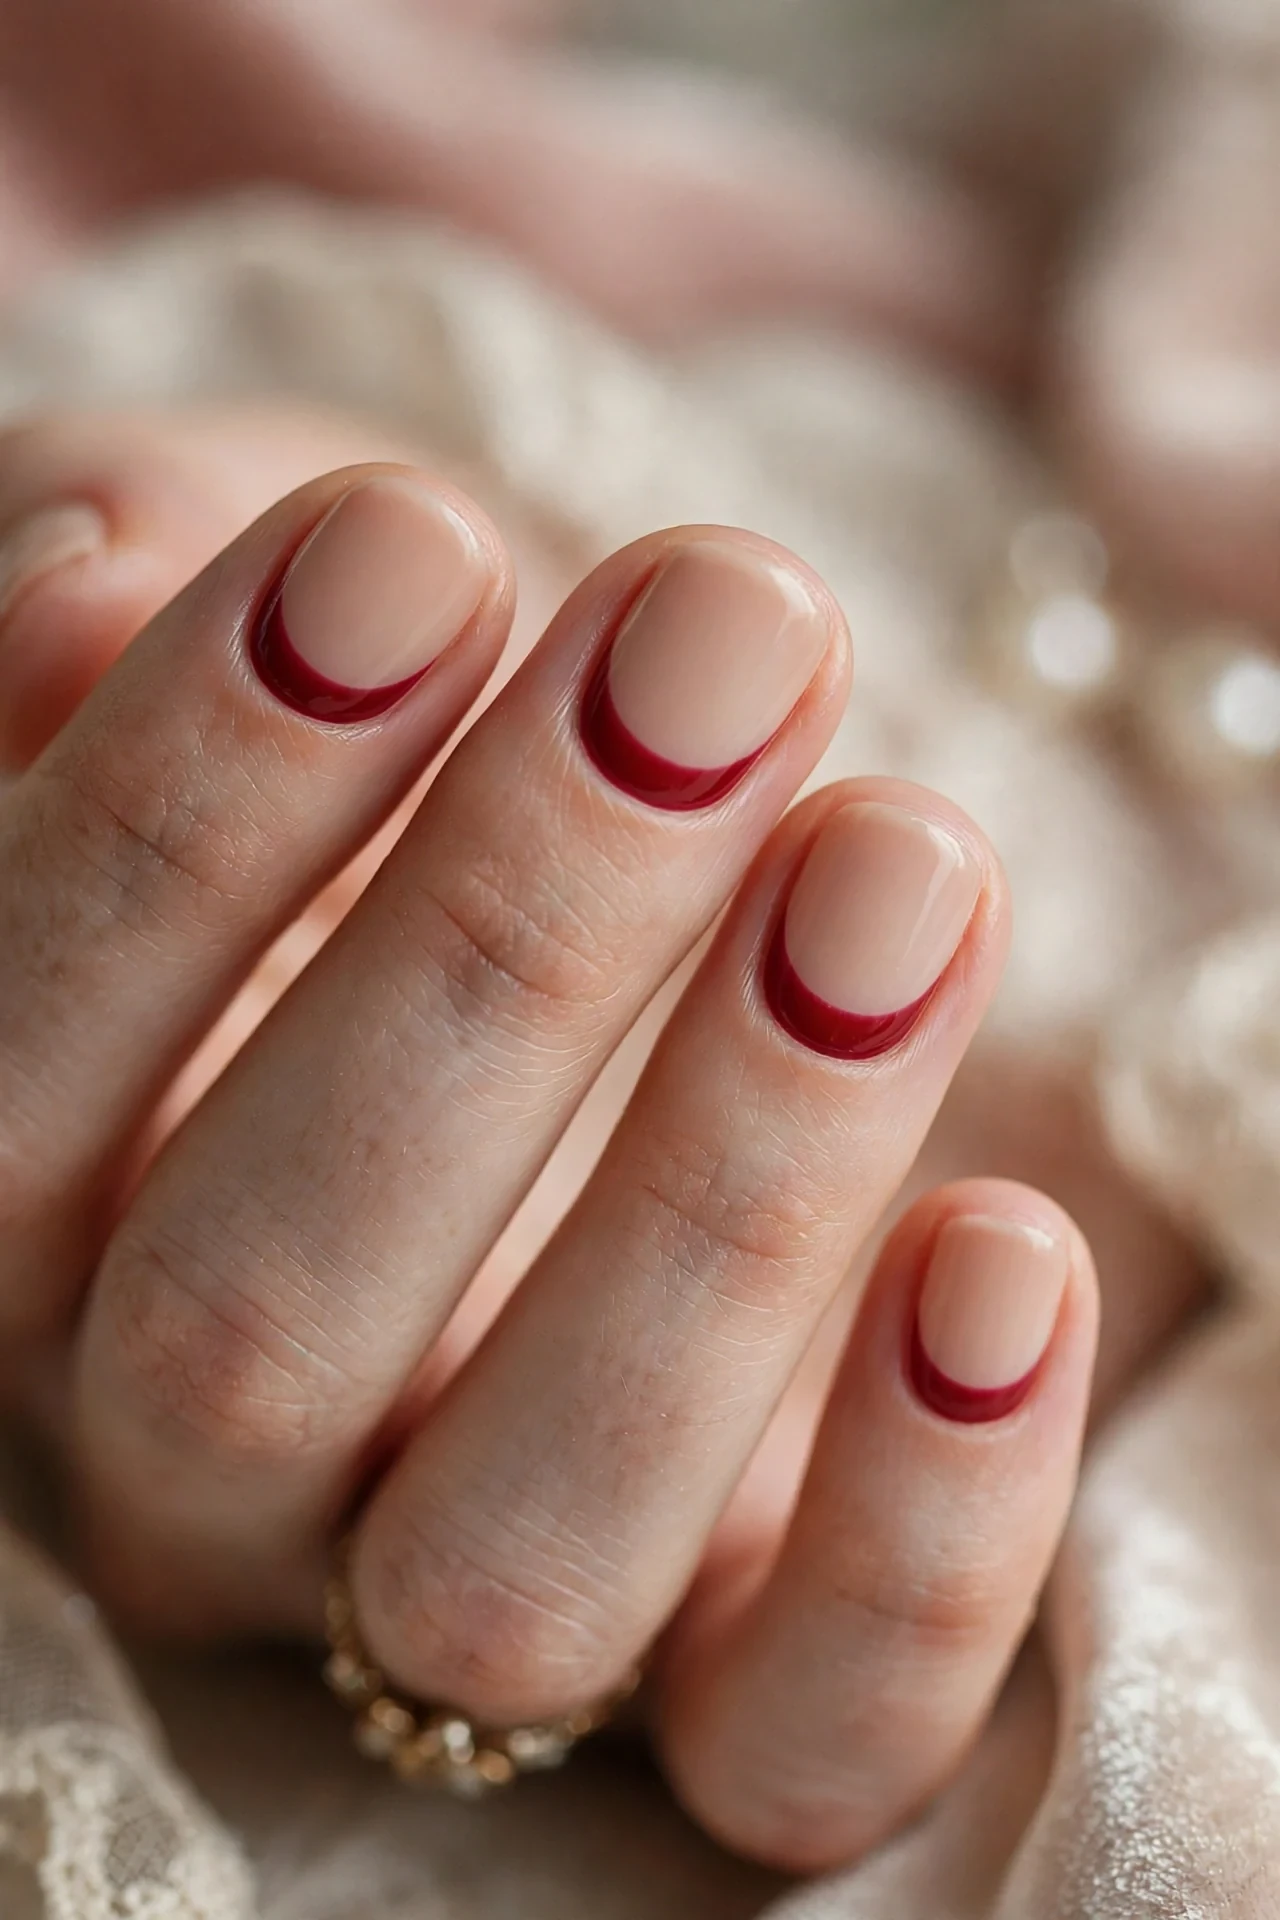
The half-moon manicure flips the French on its head: a cherry red crescent hugging the cuticle over a nude or bare nail base. This vintage-inspired design feels fresh again in 2026’s signature shade — graphic, elegant, and just unexpected enough to start conversations. It is particularly flattering on shorter nails and round shapes, where the crescent elongates the nail bed visually. Bonus: because the design sits at the cuticle, regrowth is far less noticeable, making this one of the longest-looking-wear options on this list.
- Apply a nude base or leave nails bare with a strengthening base coat.
- Paint a cherry red crescent along the cuticle using a detail brush.
- Keep the moon’s curve smooth and consistent across all nails.
- Seal with a glossy top coat, capping the free edge.
Ask your tech for “a cherry red half-moon manicure on a nude base” — reinforcement stickers (the little rings for paper holes) make perfect DIY guides: place one at the cuticle, paint over it, and peel away for a crisp crescent. Since the color sits away from the tip, chips are rare and regrowth blends invisibly; expect three weeks or more from gel. Touch up the top coat weekly and this design outlasts almost everything else in your rotation.
Matte Cherry Red Nails

Matte cherry red is the same iconic shade wearing a completely different outfit. Without shine, the color turns deep, velvety, and almost edible — closer to crushed cherries than polished glass. A matte finish absorbs light instead of reflecting it, which gives the manicure a modern, fashion-editorial edge and makes the red appear richer and slightly darker on the nail. It flatters every skin tone, looks striking on medium-to-long almond or coffin shapes, and hides tiny surface imperfections better than gloss ever could. If glossy red feels too classic for your taste, matte is the cool, confident alternative that still reads unmistakably cherry.
- Shape and file your nails into an even almond or coffin silhouette first.
- Apply two thin, even coats of cherry red gel or lacquer.
- Finish with a quality matte top coat — never mix gloss and matte layers.
- Revive the velvet finish on day four with a fresh matte top coat.
In the salon, ask for “a cherry red matte gel manicure with a velvet finish” — most techs will reach for a matte top coat over their standard cherry red. For DIY, you only need one extra product: brush any cherry polish you already own with a good matte top coat and the transformation is instant. One caveat: matte surfaces show skin oils and fingerprints, so wipe nails with an alcohol pad when they start looking shiny at the edges. Wear time matches glossy gel at two to three weeks, though the matte layer can dull — a quick top-coat refresh brings it straight back to life.
Cherry Jelly Nails
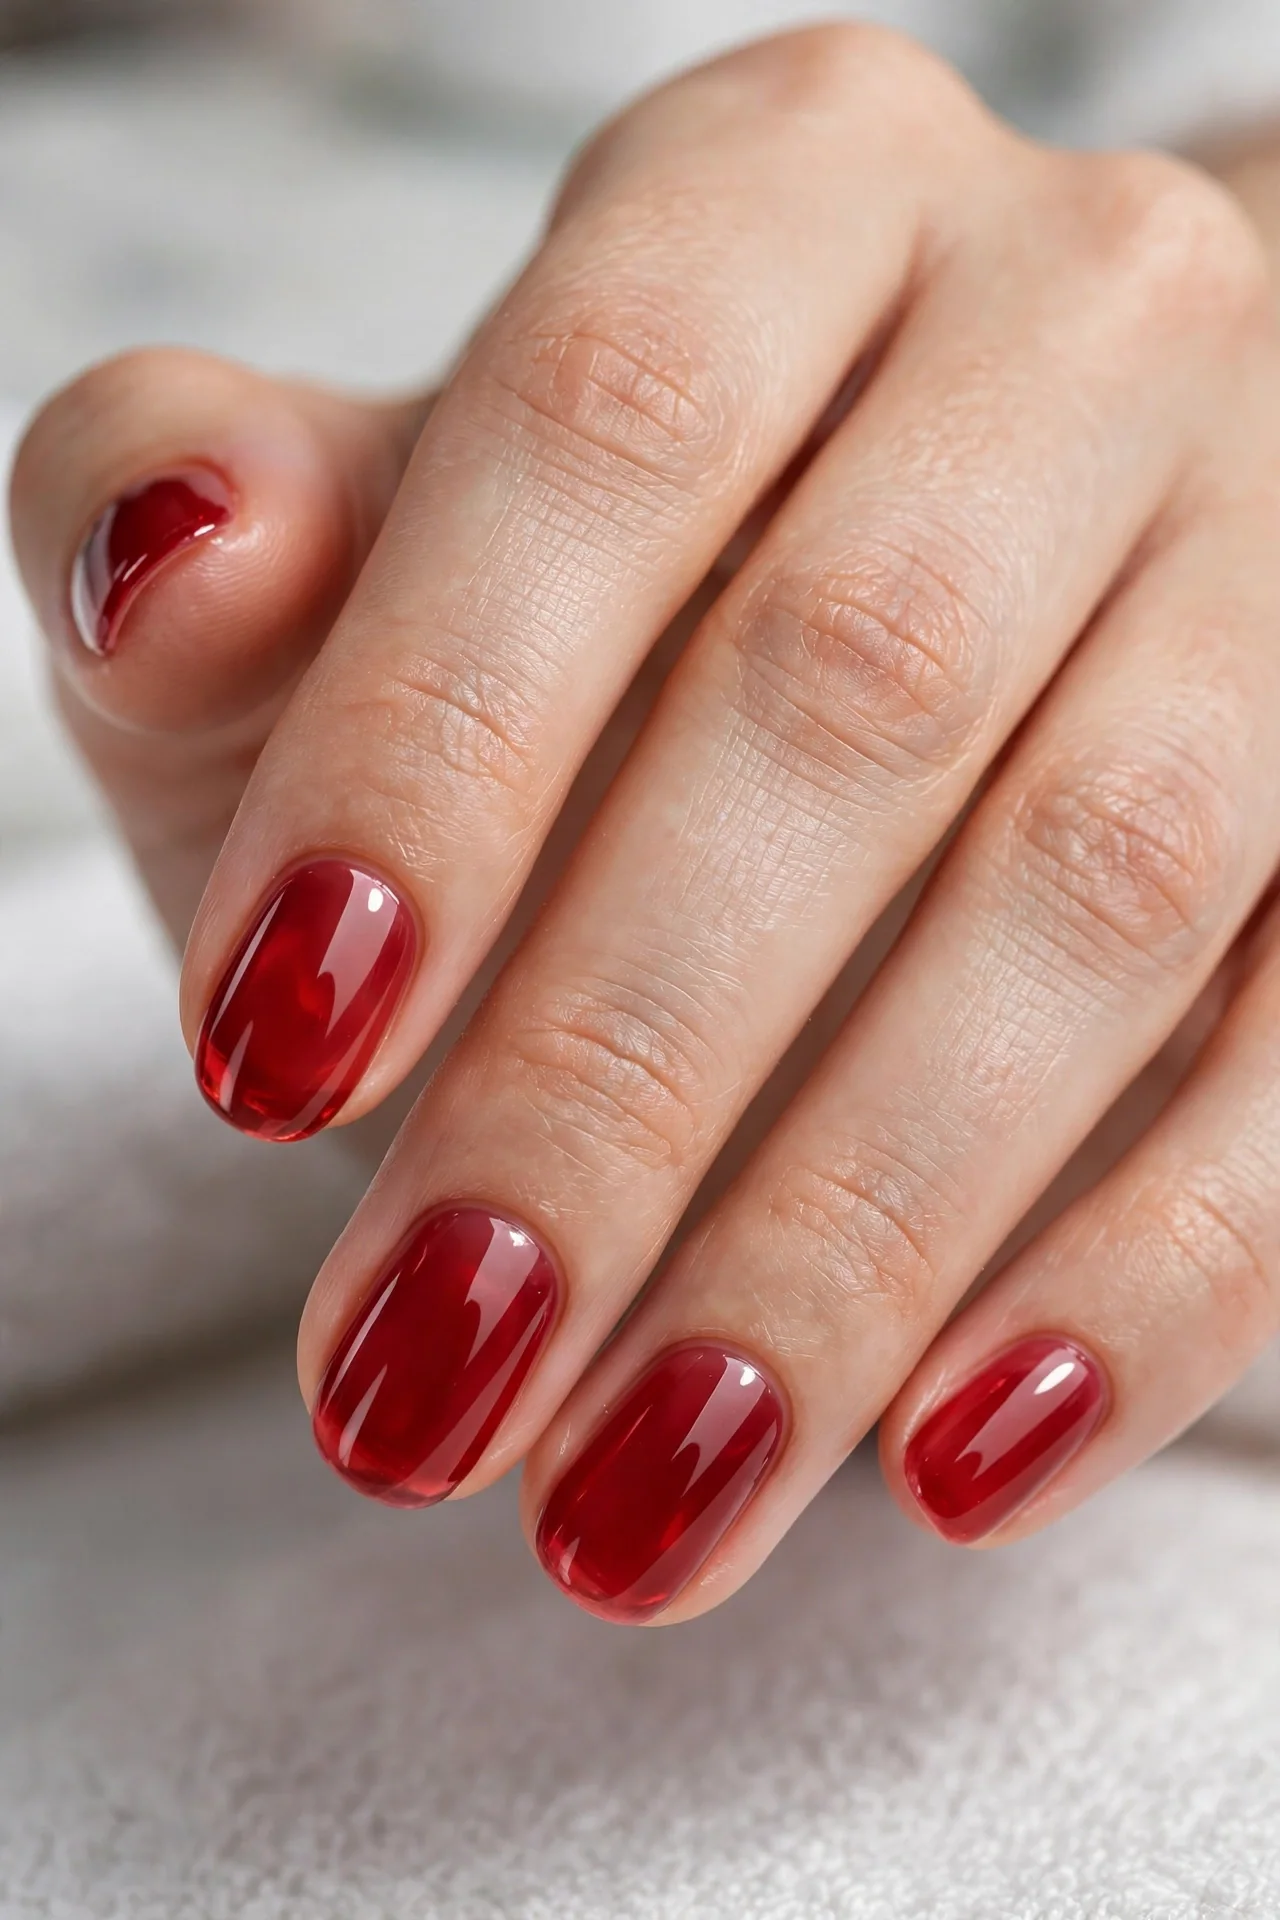
Cherry jelly nails are the playful, juicy corner of the trend — a translucent, see-through red that looks like gummy candy or stained glass on your fingertips. Instead of opaque coverage, sheer jelly polish builds depth layer by layer, letting light pass through for a squishy, syrupy glow that flat color cannot replicate. This finish is made for anyone who loves cherry red but wants something lighter and more youthful. It works beautifully on short and medium nails, where two coats give a perfect wash of color, and three coats on longer nails deliver that deep, glassy cherry intensity.
- Start with a clear or sheer pink base coat on every nail.
- Float on thin layers of true cherry jelly polish, not regular lacquer.
- Allow each layer to dry completely before adding the next one.
- Finish with a glassy high-shine top coat for the juicy effect.
Ask your tech for “cherry red jelly nails with a translucent layered finish” — salons stock jelly polishes in most core colors, so this is an easy request. For DIY, make sure the bottle actually says jelly or sheer; a thinned-out regular red will go streaky instead of glassy. Short nails need just two coats, while long nails can take three or four without looking heavy. Lacquer versions last five to seven days, gel versions a full two to three weeks, and regrowth is forgiving because the sheer layers blend seamlessly as nails grow out.
Cherry Velvet Cat-Eye Nails
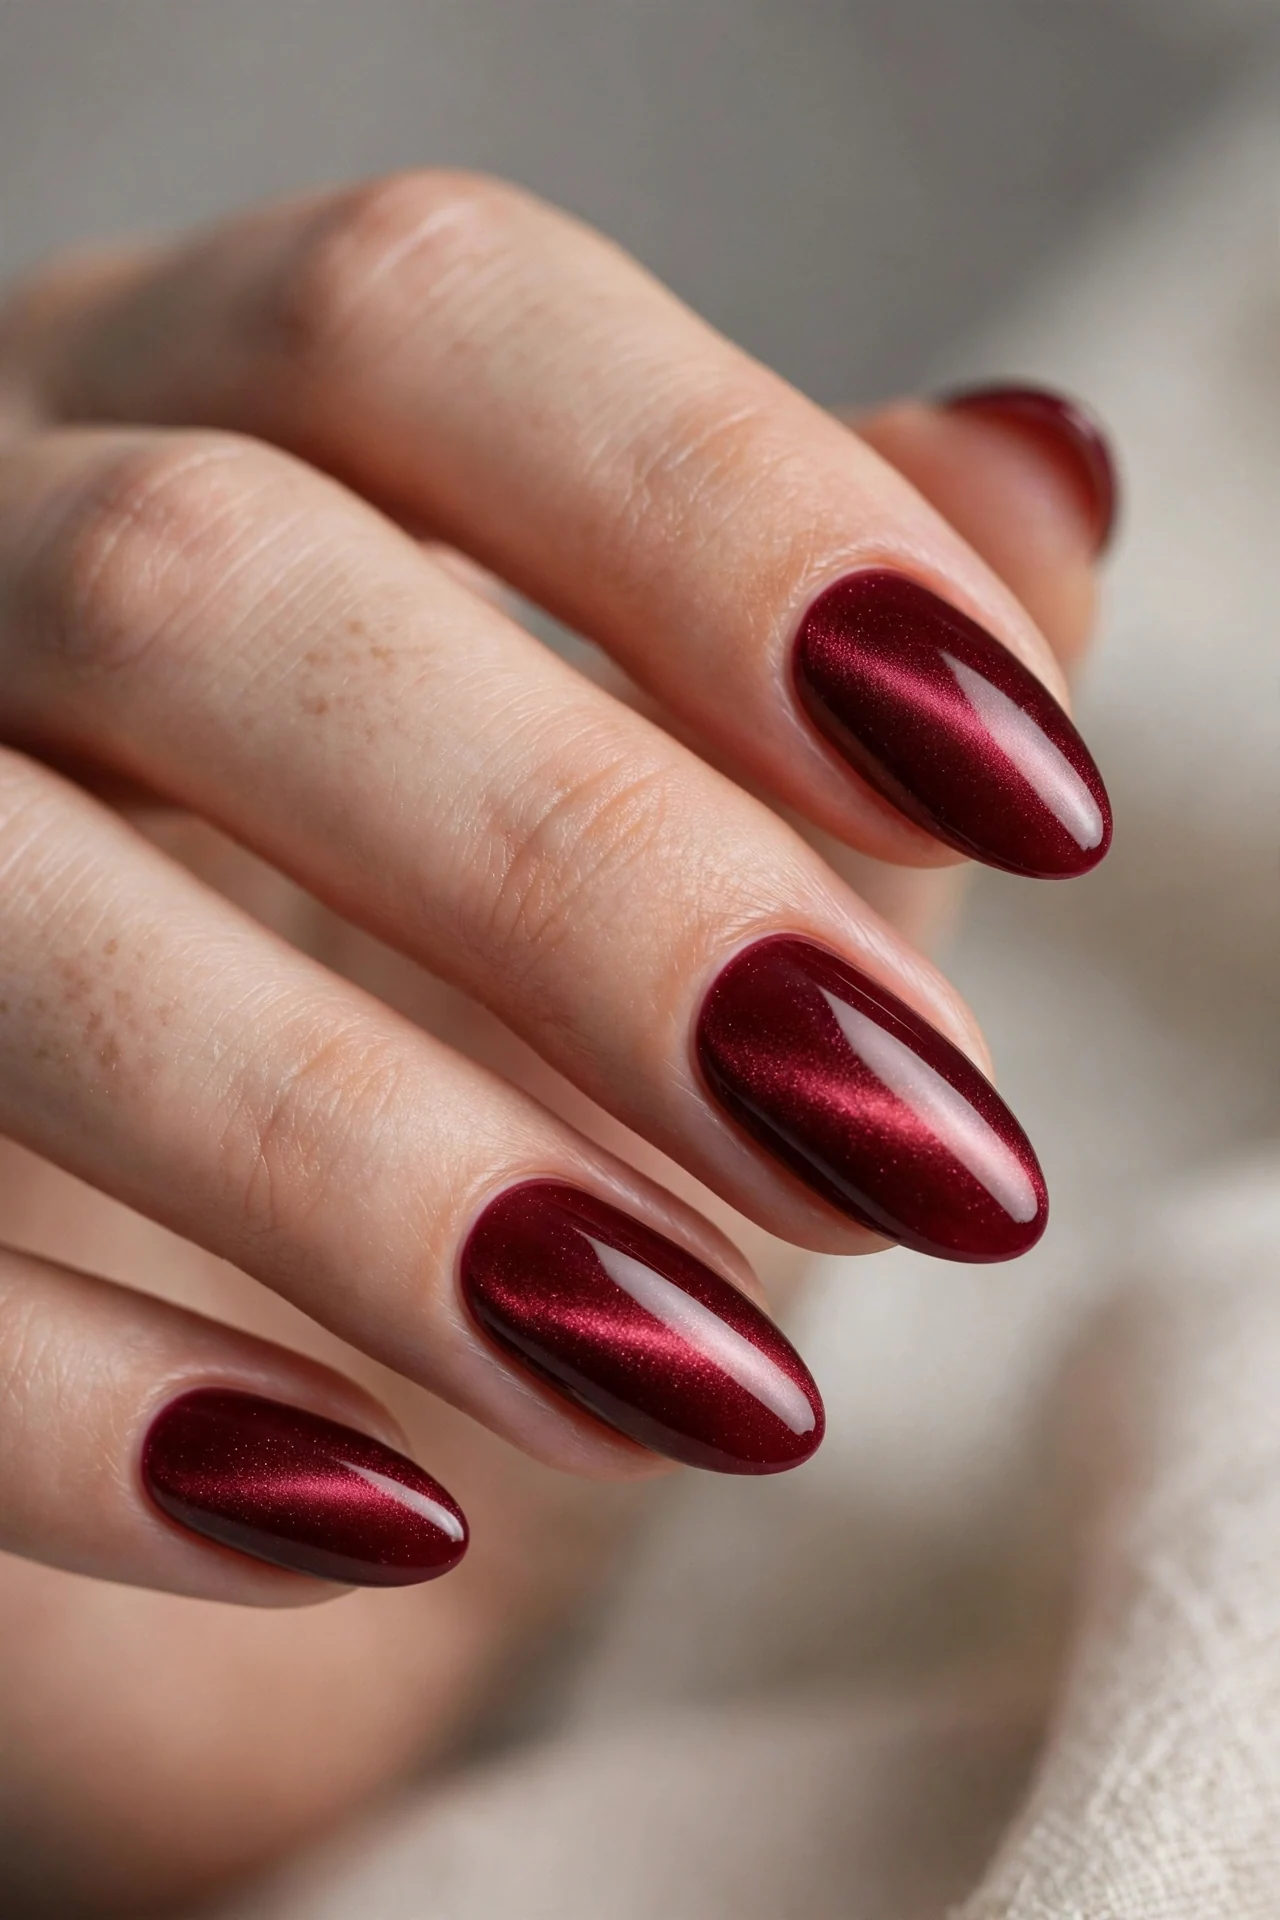
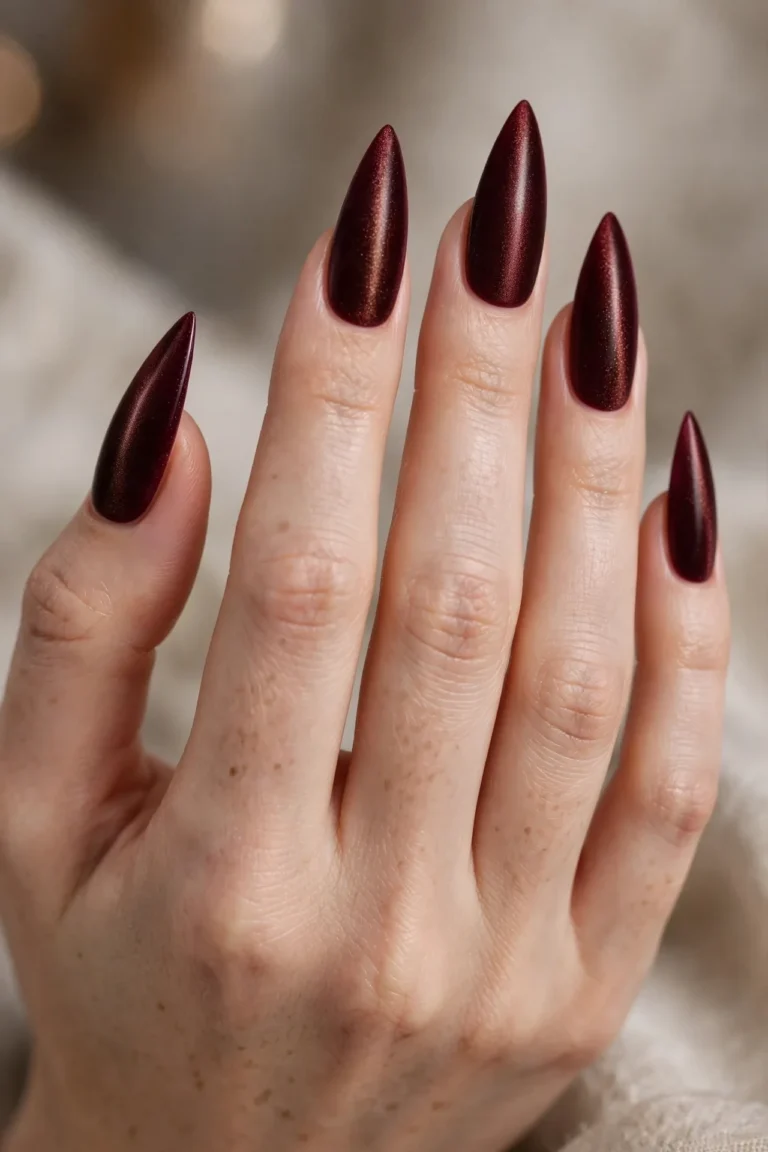
The velvet cat-eye takes cherry red into full luxury territory. Magnetic gel polish holds tiny metallic particles that a magnet pulls into a shimmering band of light across each nail — the effect looks exactly like crushed velvet fabric shifting as you move your hands. Over a deep cherry base, the cat-eye glow reads rich and dimensional, almost three-dimensional, making this the most mesmerizing finish on the list. It is made for evenings, events, and anyone who wants their manicure noticed from across the room. Medium to long almond or coffin shapes show off the light band best.
- Apply a deep cherry red magnetic gel polish as your base.
- Hold the cat-eye magnet close above the wet polish without touching it.
- Tilt the magnet slowly to shape the light band where you want it.
- Cure each nail immediately after the magnet positions the shimmer.
Request “cherry red velvet cat-eye with magnetic gel” at the salon — it is a standard technique, but confirm your tech has a strong cat-eye magnet, since weak ones give a faint band. For DIY, you need a magnetic gel polish and the matching magnet; work one nail at a time because the particles keep drifting until cured. A dark cherry base gives the most dramatic contrast — lighter reds wash the effect out. Seal with top coat and expect two to three weeks of wear, with the velvet shimmer staying vivid the entire time.
Cherry Red Nails with Black Tips

Cherry red with black tips is the boldest pairing on this list — a glossy cherry base finished with jet-black French tips for maximum contrast. The combination is edgy and high-fashion, with a hint of rock-chick attitude, yet the French structure keeps it polished rather than messy. It reads dramatic without going full Halloween, making it a year-round statement for anyone bored of classic French. This design needs some nail length to show off the contrast, so medium to long square or almond shapes work best, and it flatters every skin tone.
- Paint the full nail with two coats of glossy cherry red.
- Add black tips with a detail brush or French tip guides.
- Refine the smile line with a flat brush dipped in acetone.
- Seal with a glossy top coat to lock the contrast in place.
At the salon, say “cherry red base with black French tips” and choose your tip depth — a thin line reads chic, while a deep dramatic tip leans edgier. For DIY, let the cherry base dry completely before adding black, or the colors will bleed at the edge; French guides make the smile line far easier on your dominant hand. Gel versions last two to three weeks. Feeling experimental? Flip it — a black base with cherry tips is the same energy in reverse and photographs just as strikingly.
Cherry Marble Swirls
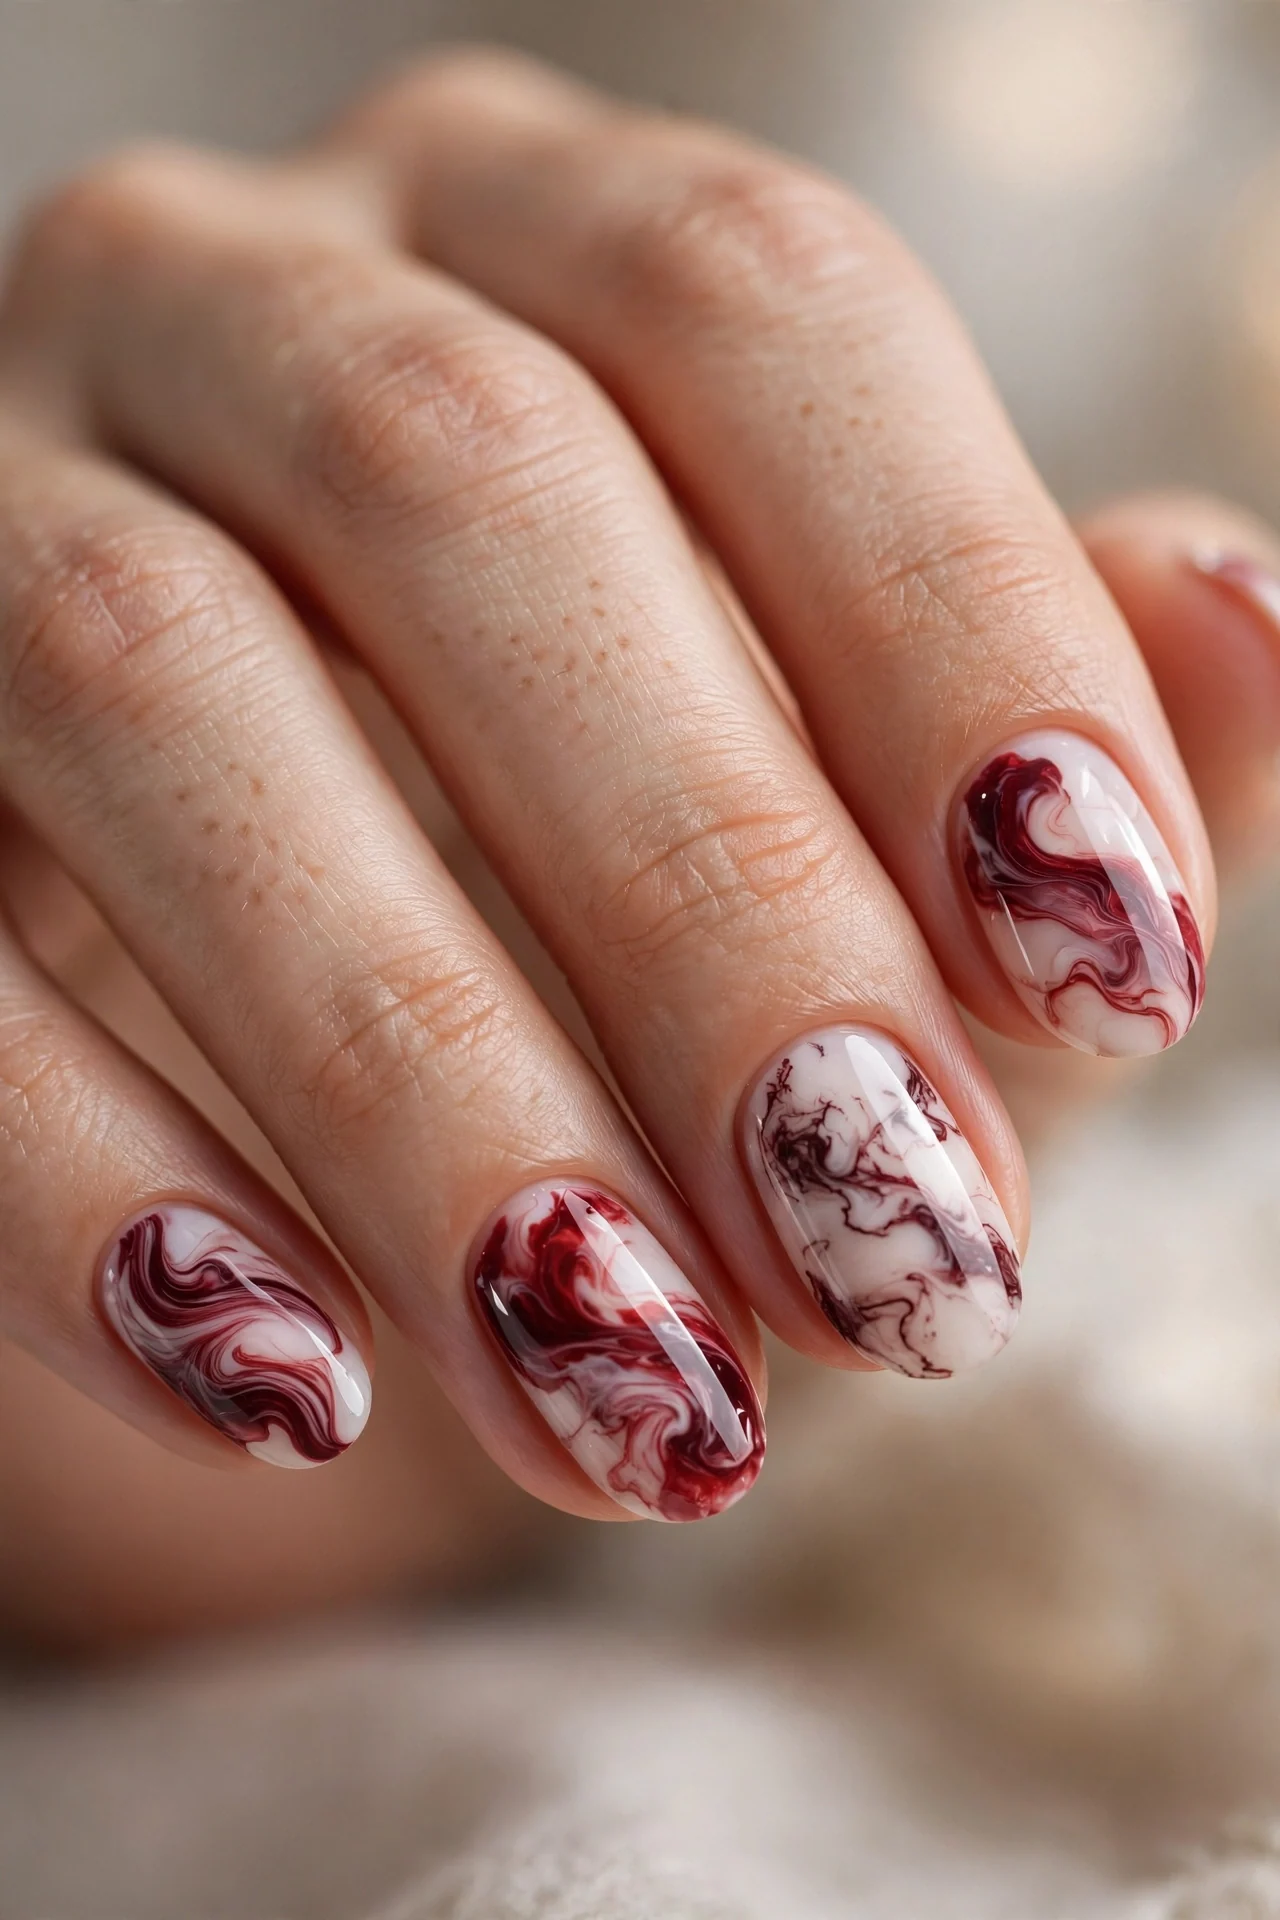
Cherry marble nails swirl deep cherry red, burgundy, and milky white into a stone-like pattern that makes every nail a tiny work of art. The marbled veins catch the eye with their organic, unpredictable flow — no two nails ever match, which is exactly the appeal. This is the most artistic finish in the roundup, perfect for anyone who wants nail art that looks expensive and custom rather than stamped on. It works on any nail length, though longer nails give the swirls more room to dance, and the mix of red tones keeps it firmly in the cherry family.
- Apply a milky white or nude base and cure it only halfway.
- Drop cherry red and burgundy polish onto the still-wet layer.
- Swirl the colors gently with a detail brush or dotting tool.
- Cure immediately once the marble pattern looks the way you want.
Ask your tech for “cherry red marble nail art with burgundy and milky white swirls” — most salons do this with the wet-on-wet technique above. For DIY, liquid latex around the cuticles saves cleanup time, and practicing on a nail tip first helps you learn how much polish to drop. Water marbling is another route: drop polishes into lukewarm water, swirl with a toothpick, and dip — but the wet-layer method is far easier for beginners. Expect two to three weeks of gel wear, with the busy pattern hiding chips beautifully.
Conclusion
Cherry red earned its 2026 crown because it does something rare: it feels bold and timeless at the same time, and these 15 ideas prove there is a version for every nail length, lifestyle, and mood — from glassy almond solids to dreamy aura fades. Pick the one that matches your week, book the appointment or break out your polish, and wear the shade everyone will be asking about. When you are ready to explore the deeper end of the red family, our 10 Moody Plum Nail Ideas continue the rich-color story beautifully — and do not be surprised if cherry red becomes your most-requested shade all year long.
More nail ideas you’ll love: 15 November Nail Colors and 15 Pearl Chrome Nail Ideas.